BLACKMAILLE
Part 13 - Riveted Mail
by Lord Thomas the Black
BLACKMAILLE
RIVETED MAILLE
Welcome back to Blackmaille! On with the show…
Last month, we talked about the modern, but relatively easy butted mail. This month we're going to discuss the much less common, but more period, riveted mail. In riveted mail, each ring is sealed shut with a tiny rivet (hence the name), giving it much greater strength and resilience than butted mail. Riveting the rings also allows the mailler to use much lighter-weight wire without sacrificing durability. A riveted hauberk weighs (on average) roughly half of what a similarly-styled butted hauberk weighs.
There is less information about the mechanics of riveted mail available online, but there are many, many more examples of the real thing in museums. Riveting is how mail was made in the Middle Ages, with few exceptions (Japanese mail, quick fixes, etc). the methods used in coiling, cutting, and weaving riveted mail are basically the same as with butted mail, but with a few added steps along the way. A step-by-step breakdown of the process looks like this:
1.) coil wire
2.) cut coil into rings
3.) overlap ends of rings
4.) anneal the rings
5.) flatten the overlap (or the whole ring)
6.) anneal the rings again
7.) punch rivet holes in rings
8.) make your rivets
9.) weave mail row-by-row until insanity kicks in
To elaborate on a few of the steps:
Step 1.) Make sure you use mild steel wire for riveted mail, as there are two annealing steps in the process, and galvanized steel gives off harmful vapors when heated.
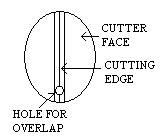
Step 3.) Because of this step, it becomes necessary to either coil your rings a size larger than you want your finished ring to be (for example, coil 3/8" rings for 5/16" rings after overlapping), or to modify your cutters to cut the rings with an overlap already built in (which is what I did). All this entails is drilling a small hole the diameter of your wire into one side of your cutters, so that the jaws skip over a turn in the coil before cutting. This is also useful when making Japanese mail.
Steps 4 and 6.) This is best done by stringing a small handful of rings onto a loop of wire and heating them to a glowing red with a MAPP gas torch. MAPP gas burns hotter and cleaner than propane, so it will heat the rings to red faster and won't smell as bad. Then, after heating the rings, let them cool down at room temperature. This will soften the metal and make the next steps easier.
Step 5.) This is largely a matter of personal choice, as there are period examples of both methods being used. I personally find it easier to flatten the entire ring, and I use a ring flattener from DeCordene' Wireworks (www.dcwireworks.com) to do it. This ring flattener is just a steel cylinder with a hole drilled through it, and a piston that fits just inside that hole. All that's necessary to flatten the ring is to place the cylinder on the face of an anvil, drop the ring into the hole, put the piston in on top of it, and give it a few good blows with a hammer. This flattens the ring smoothly and evenly.
Step 7.) What kind of hole you punch is going to be determined largely by what kind of rivet you use. See step 8 below.
Step 8.) Making your rivets is again a matter of personal preference. There were two main styles of rivets used in period: round and wedge. For the most part (and here I'm generalizing to avoid arguments about local particulars), wedge rivets were used in European mail, and round rivets were found in Middle-Eastern mail. There were a few exceptions, with round rivets being found in some German and Italian examples, but those were few and far between. To make round rivets, take a small straight pin and insert it into the rivet hole in your ring. It should lie flush with the ring at the head, and extend through the bottom of the ring, on the underside of the ring, clip off most of the excess pin, and peen the remainder over to seal the ring shut. Wedge rivets are easier. Simply hammer a length of wire (the same wire you used for the rings is perfect) flat on your anvil, then cut it into wedges like this: /\. The downside of wedge rivets is that they have to be annealed as well. Cut a lot of rivets, then put them all in a spoon you don't plan on using again (be sure it's stainless, and wear gloves). Heat the spoon from underneath with your MAPP gas torch until the rivets on top turn a glowing red. Then set the spoon someplace where it won't set something on fire until it cools. Then simply set your wedge rivet into the slot on the ring and crimp it with a pair of setting tongs (more on those later).
Now, there are a number of tools particular to riveted mail that aren't used for butted mail. I've already mentioned the ring flattener. In addition, you will need the following:
Anvil - I use a 22-lb. Cast anvil from Harbor Freight Tools. It cost about $22.00, and is small enough to carry with me to demos, but still large enough to have a decent working surface.
Hammer - I use a 3-lb. cross-peen hammer, also from Harbor Freight Tools (about $7.00). You just need something that feels comfortable in your hand, and that has enough weight to get the job done without a lot of exertion. You want the hammer doing most of the work, as there's not much room for error when flattening a 5/16" diameter ring.
Punch Tongs - These are the hardest part about doing riveted mail, as there aren't any good commercial suppliers of punch tongs out there. The only ones I was able to find were either modified slip-lock pliers (which looked atrocious) or were made in Germany, and only available in a kit. You'll have to make your own if you want them to look good. How you make these is going to be determined by what kind of rivet you want to use. Obviously, for wedge rivets you want your punch tongs to cut a slot in the rings, while for round rivets you need them to punch a hole. I've seen Roper-Whitney punches modified for round rivets, but mine are modified end nippers (the same kind I use to cut my rings with) with a chisel-shaped bit for punching the slot. I unfortunately can't tell you how to make them, as mine were machined by a friend of mine.
Setting Tongs - Oddly enough, unlike the punch tongs, these are commercially available from a couple of different sources. DeCordene' Wireworks (www.dcwireworks.com) sells one, and you can find one at The Ring Lord (www.theringlord.com) as well, but the best ones I've seen are made by Forth Armoury (www.forth-armoury.com). Again, mine are modified end nippers made by a friend of mine.
One odd thing I've learned from doing riveted mail is that most likely, medieval maillers 't weave their mail using "fivelets" (or "basic units") like modern maillers do. As evidence for my theory, I submit the fact that period mail all has the peened side of the rings facing the same way, indicating that they wove row-by-row. In my experience with riveted mail, weaving it with fivelets results in some rivets facing out, and some facing in, and doesn't look as smooth or as professional as having them all facing the same way.
If all of this sounds like a time-consuming process, it is. This is likely why most re-creationists don't want to work in riveted mail. However, in the Middle Ages, mail was made by specialized guilds, much like (but separate from) armorers' and smiths' guilds. In any given mailler's shop, you would see the master mailler's apprentices working in an assembly-line, each apprentice on a different step in the process. There would be one coiling the wire, one cutting rings, one flattening rings, and so on, with the master mailler weaving the finished product. In some cases in Germany and Italy, where a lot of armor was made for export to other countries, whole villages would be employed in the manufacture of mail armor.
In conclusion, riveted mail is really no more difficult to create than butted mail, only requiring a little more in the way of tools and time to accomplish. I think the end results are worth it. A mailler working with riveted mail ends up with a finished product that is lighter-weight, more durable, and more authentic than the same garment constructed of butted mail.
As always, thank you for joining me for another month. Any mail-related questions can be sent to:
Blackmaille
c/o Tom Beckett
6522 E 125th St, Apt #2
Grandview, MO 64030
Next month, we'll discuss a relatively new (theoretical) use for the brass trim seen on so many period mail garments. See you next month!
Back to the Blackmaille Webpage
Back to the Cúm an Iolair Information Webpage
Articles: ©2003, 2004, 2005, 2006
Thomas Becket/Lord Thomas the Black
Hosting: ©2003, 2004, 2005, 2006
Ron Knight/Modar Neznanich
e-mail: modar@everestkc.net