BLACKMAILLE
Part 15 - Inlays
by Lord Thomas the Black
BLACKMAILLE
INLAYS
Welcome back to Blackmaille!
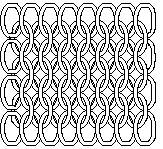
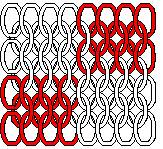
This month I'm going to show you how to do inlays. Inlays are designs or pictures woven into your mail with a different metals (or metals) so that it stands out. The most common type is a brass design woven into a steel shirt. Pretty much anything made of mail can have an inlay, however, and you're not limited to single-color designs. With the use of anodized aluminum or heat-colored titanium, a wide variety of effects can be achieved. I'm currently charting out a four-color reproduction of one of my favorite bands' T-shirts in anodized aluminum!
To do any inlay, you'll need the following:
1.) the picture you want as an inlay
2.) a large sheet of graph paper (available at most art supply stores)
3.) a pencil
4.) pens in whatever colors you want for your design
5.) a pattern for the mail item you're constructing
This is the easiest method I've found for charting inlay patterns, and it works for me.
Take your piece of graph paper and lay out your pattern for your mail item using a scale of one square per ring. For instance:
|
|
|
|
|
|
1 basic unit of European 4-in-1 mail =
So,
|
|
|
|
|
|
|
|
|
|
|
|
|
|
|
|
|
|
|
|
|
|
|
|
|
|
|
|
|
|
|
|
|
|
|
|
|
|
|||||||
Equals
Now, following the instructions for your pattern, chart out the individual pieces that you want your inlay on. For instance, your pattern calls for the front of the shirt to be 40 Basic Units wide and 30 Basic Units long. On the graph paper, you'll draw a piece 80 squares wide by 60 squares long (2 sq. X 2 sq. = 1 BU).
Next, take your picture of your design and slide it under the graph paper. It may help to use a light-box for this step. Center your design on the pattern piece, then take your pencil and trace your design onto the graph paper. If making a multi-color design, you may want to use different colored pencils on the tracing.
Once your design is traced onto your pattern, use your colored pens to put an "X" into every square that lies within the pencil lines. For the ones that are half in, half out of the lines, use your judgment. It all depends on the picture.
|
|
|
|
|
X |
X |
X |
X |
|
|
|
|
|
X |
X |
X |
X |
|
X |
X |
X |
X |
|
|
|
|
|
X |
X |
X |
X |
|
|
|
|
Finally, when you weave your mail piece, refer to your pattern, and just take it row-by-row. Those of you familiar with counted cross-stitch will know what I'm talking about. It's the same concept. For instance, if your pattern has four blank squares, the four x'd squares, that translates to four steel rings, then four brass rings.
|
|
|
|
|
X |
X |
X |
X |
|
|
|
|
|
X |
X |
X |
X |
|
X |
X |
X |
X |
|
|
|
|
|
X |
X |
X |
X |
|
|
|
|
Equals
Doing your inlays this way, it's possible to produce very beautiful, ornate designs with very little effort.
Alternatively, if you have access to a computer with a scanner, there are programs available that will translate a scanned picture into a full-color counted cross-stitch pattern. I don't have any personal experience with these programs, but I'm told they work very well. It should serve just as well for mail, as it's the same idea I covered here.
Thank you for joining me for another month! As usual, if you have any mail-related questions, please send them to:
Blackmaille
c/o Tom Beckett
6112
E 126th St, Apt 104
Grandview, MO 64030
Next month, we'll cover another interesting use for brass: signature rings!
See you next month!
Back to the Blackmaille Webpage
Back to the Cúm an Iolair Information Webpage
Articles: ©2003, 2004, 2005, 2006
Thomas Becket/Lord Thomas the Black
Hosting: ©2003, 2004, 2005, 2006
Ron Knight/Modar Neznanich
e-mail: modar@everestkc.net