BLACKMAILLE
Part 26 - Tailoring
by Lord Thomas the Black
BLACKMAILLE
TAILORING
Welcome back to another edition of “Blackmaille”! This month, I’m going to cover some common tailoring problems that mailers will run into, and the easiest, most pain-free way to solve them.
Before we begin, be aware that this will be the most picture-heavy article I’ve written yet, so it may take some time to load. The reason for this is two-fold: 1.) the techniques I’ll describe in this article will probably be a little hard to understand solely in text. Since I can’t be there to walk you through it in person, the pictures should clarify things a little. 2.) This article and next month’s (on tricky seams) are the result of an internal debate over whether or not I should re-write a chapter of my upcoming book (“Chainmaille in the Current Middle Ages”). It was decided that re-writing the chapter would be more trouble than it was worth, and writing these articles from scratch would be far easier.
For the purposes of this article, we’ll deal with the tailoring problems common to European 4-in-1 maille, as this was the most common type, and therefore, we have the most historical examples to draw from.
European 4-in-1 maille can be (and was) tailored in two directions: as the maille hangs up-and-down, and in the direction the rows of rings run, left-and-right. For our purposes, we’ll refer to these as the “X-axis” and the “Y-axis” (Fig. 1).
Fig. 1
Tailoring on the X-axis
This is by far the easiest direction in which to add or subtract rings. Most of your expansions and contractions will take place along this axis, particularly in the body of a hauberk (for example).
Expansions
Expansions on the X-axis are simplicity
itself. All you have to do is add a few rings into the row you wish to expand.
For example, in
Fig. 2, we have a simple chain of seven basic units (Fig. 2). I want the next
row to be longer, so I’ll add expansion rings to this row
(shown in brass for clarity) (Fig.3).
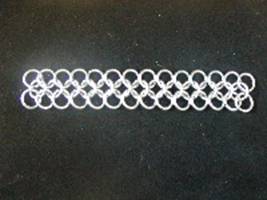
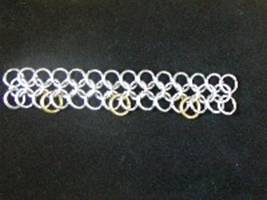
Fig. 2 Fig. 3
7-unit chain Expansion rings added
Now I’ll connect the next row as usual, and
the expansion rings will “stretch” the maille (Fig. 4). This is particularly
useful in standards and
coif tops, where the maille has to conform to a curved or round surface.
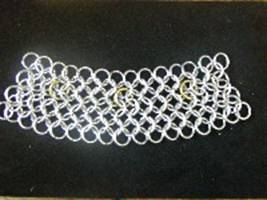
Fig. 4
Expanded maille
Contractions
Contractions on the X-axis are just as easy as
the expansions. Say you want to tailor a hauberk into a V-shape. As you weave
the maille
down
the body, you’ll need to make the next row down smaller in order to get that
taper. Again, we’ll start with our 7-unit chain (Fig. 5).
To make
the next row smaller, we’ll contract the bottom row. In this case, rather than
subtracting rings from the bottom row, we'll add
contracting rings (Fig. 6) that connect 3 rings, rather than the usual two.
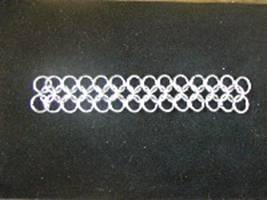
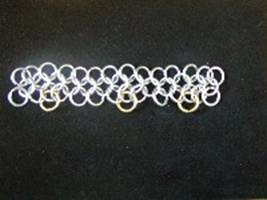
Fig. 5 Fig. 6
7-unit row Contracting rings added
Then, we continue with the maille as usual, but the next row has less basic units, thanks to the contractions (Fig. 7). It’s just that easy.
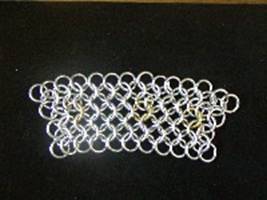
Fig. 7
Contracted maille
Tailoring on the Y-axis
Expanding and contracting on this axis is a bit trickier, but a lot less common. Most often, you’ll see these tailoring techniques used in the sleeves of hauberks and on voiders, where the shape of the maille has to follow the contour of the arm.
Expansions and contractions both are what we call “whole row”, meaning you’ll either add (for expansions) or remove (for contractions) an entire row of maille. As a result, you’ll need less tailoring on the Y-axis than on the X-axis.
Expansions
Expansions on the Y-axis start with knowing
where you need to add a row. In this example, I have two rows of maille that
need to be
expanded to three.
I start by removing the connecting rings between the two rows (Fig. 8). Next,
I’ll add a row of rings on both the top
and bottom rows
(Fig. 9).
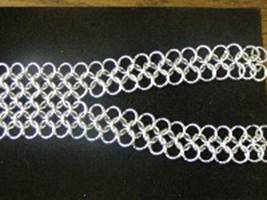
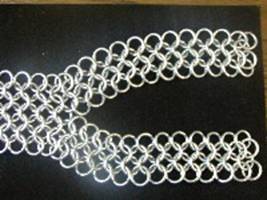
Fig. 8 Fig. 9
Connecting rings removed New rings added
Next, add another row of rings, connecting the
two at the joint (Fig. 10). Now, the sharpest of you will have noticed that the
row
you
just added will form the top and bottom rings of the third row that you wanted
to add! So, just join these rings as usual (Fig. 11),
and
you’re done!
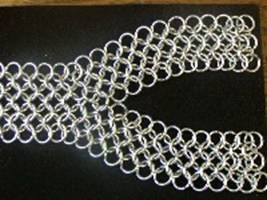
Fig. 10 Fig. 11
Next row added 2-row to 3-row expansion completed!
Contractions
Contractions on the Y-axis are done similar
to expansions in reverse. In this case, we’ll be taking a 3-B.U. strip of maille,
and contracting it down to 2 B.U.’s (Fig.12). as you can see, I’ve laid out
where I’m starting, and what I want at the end.
Keeping your goals clear like this will make things easier later on. Now, I add
2 rings to the join, creating a triangle effect (Fig. 13).
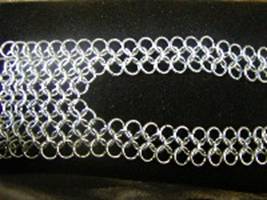
Fig. 12 Fig. 13
3 B.U (left) to 2 B.U. (right) New rings added
Next, connect these two rings together,
pulling the maille in closer (Fig. 14). Now, add two more rings, hooking your
two outside
rows to the center ring (Fig. 15).
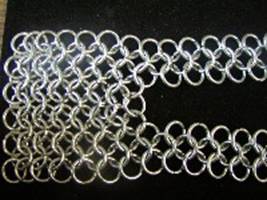
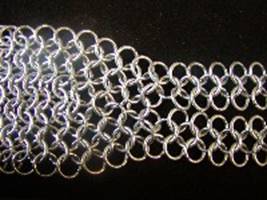
Fig. 14 Fig. 15
New ring added (center) Outside rows connected
Finally, connect your two rows to each other as usual, and continue down the row (Fig. 16), and you’re done!
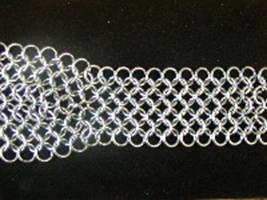
Fig. 16
3-row to 2-row completed
6-in-1 Expansions/Contractions
Oddly enough, despite the added number of rings, expansions and contractions in European 6-in-1 are really not all that much different than in 4-in-1. The main difference is in how many rings the expansion/contraction rings must pass through. It just takes a little more attention to detail, however, and shouldn’t be that difficult.
NOTE: For the purposes of this article, I’m only going to cover expansions/ contractions on the X-axis. The reason for this is that Euro 6-in-1 was only used in period for the collars on standards and some hauberks. 6-in-1 was used because the denser weave would stand up on its own to protect the neck better. As a result, the only taper needed would be along the X-axis.
*** All of the demonstration pieces for this section were provided by my student, Miles Magus (MKA Louis Soetaert). ***
Expansions
To expand a strip of 6-in-1, we start with the
row to be expanded (Fig. 17). Next, starting with the end of the row, we count 4
rings over,
and add an
expansion ring. The difference between the 4-in-1 expansions and 6-in-1 is that
in 6-in-1, the expansion ring will pass through
two rings
instead of only one. Now count 4 rings and add another expansion ring, and so on
until you reach the end of the strip (Fig. 18).
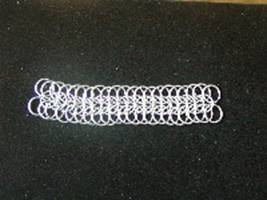
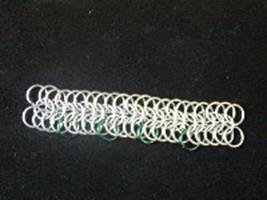
Fig. 17 Fig. 18
6-in-1 strip Expansion rings added
Finally, add the next row of 6-in-1 as normal,
counting the expansion rings the same as you did on the 4-in-1. The next row of
maille
will be longer, and the result
will look like this (Fig. 19):
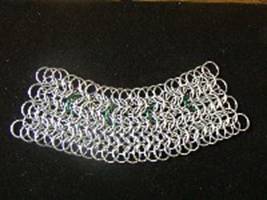
Fig. 19
Expanded 6-in-1
Contractions
To contract a row of 6-in-1, you’ll follow
much the same process as you did to contract 4-in-1. However, where in 4-in-1 it
was
a
simple matter of contracting by 1 and ½ B.U.’s, in 6-in-1 it’s not quite that
easy. The odd number of rings in each basic unit adds
a new
challenge to this process. You’ll find that it’s a challenge that can be
overcome, though.
To contract 6-in-1, we’ll start with a strip
of 6-in-1 just as we did with the expansions (Fig. 20). To this we’ll add our
contracting
rings
(Fig. 21). The contracting rings take a little more attention here than they did
in the 4-in-1, because of the odd number of rings
in each
unit. Starting from one end of the row, count three rings over (that’s your
first BU), then three more rings (second BU), then
two
more, and put your first contraction ring through the second BU and the two
rings. Next, count three more rings over (1 BU space
between
contractions), then another three rings, then just one more ring, and put your
next contraction through these four. Continue
in this
fashion (5-ring then 4-ring contractions, with at least 1 whole BU’s between
them) until you’ve reached the end of the piece.
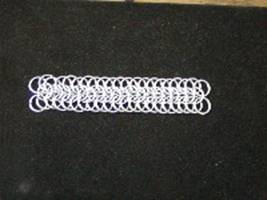

Fig 20 Fig 21
6-in-1 strip 6-in-1 strip with contractions
Finally, just add your next row of 6-in-1 as
usual, and you’re done (Fig. 22)! You’ll notice how the next row down is shorter
because
of the
contractions.
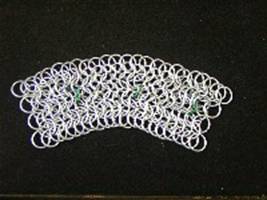
Fig. 22
Contracted 6-in-1
If this seems confusing, don’t worry too much about it. In reality, 6-in-1 contractions are rare, as 6-in-1 was usually used on the collars of hauberks and on standards, so the natural construction of it is to expand from the hem to the base, where the neck gets wider into the shoulders. You may never need to contract 6-in-1. I include it here for purposes of completeness.
Well, that wraps it up for this month’s “Blackmaille”. I had intended to have a section on odd seams, but as this article was already running eight pages and 22 pictures, I decided to cut it off here and write a separate article for the seams. So, join me next month for everything you ever wanted to know about odd seams, including how to join 4-in-1 to 6-in-1, hauberk armpit seams, and more! Thanks for joining me for another month!
Without Wax,
Lord Thomas the Black
of House Leatherwolf
“Artifax Ars Monstret”
Back to the Blackmaille Webpage
Back to the Cúm an Iolair Information Webpage
Articles: ©2003, 2004, 2005, 2006
Thomas Becket/Lord Thomas the Black
Hosting: ©2003, 2004, 2005, 2006
Ron Knight/Modar Neznanich
e-mail: modar@everestkc.net