BLACKMAILLE
Part 27 - Tricky Seams
by Lord Thomas the Black
BLACKMAILLE
TRICKY SEAMS
Welcome back to another edition of Blackmaille: “The Maille-Related Monthly That Wouldn’t Die” ™. On with the show…
This month, I’m going to cover some of the odd seams and joins that give maillers problems. Common joins like hauberk armpit seams and 4-in-1 to 6-in-1 connections (like you see on standards), and the less common Half-Persian 4-in-1 to European 4-in-1 connection will all be covered in detail.
As in last month’s article, this will be a picture-heavy article, and may take some time to load. The resulting pictures will be much clearer than trying to just describe the steps in text, though.
Hauberk Armpit Seams
The armpit seams on a maille shirt are some of the most problematic joins that most maillers will come across. This is because of the way a maille shirt is made. If done correctly (i.e. the way it was done in the Middle Ages), the direction of maille on the body will continue down the arms (Fig. 1)
))))))))))))))))))) ))))))))))))))))))))
(((((((((((((((((((((( (((((((((((((((((((((((
)))))))))))))))))))))))) )))))))))))))))))))))))))
(((((((((((((((((((((((((((((((((((((((((((((((((((
)))))))))))))))))))))))))))))))
(((((((((((((((((((((((((((((((
)))))))))))))))))))))))))))))))
(((((((((((((((((((((((((((((((
)))))))))))))))))))))))))))))))
(((((((((((((((((((((((((((((((
)))))))))))))))))))))))))))))))
Fig. 1
Maille Direction
This creates a situation in the armpit where the body maille, following the curve of the body, will keep the same left-right direction, while the sleeve maille, following the curve of the arm, will end up at a 90-degree angle to the body maille (Fig.2).
Fig.2
The way to connect these two divergent weaves is to ensure that the connecting ring follows each pattern as it passes through (Fig. 3-5)
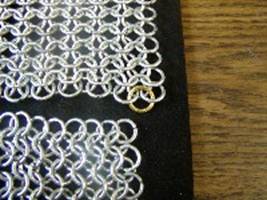
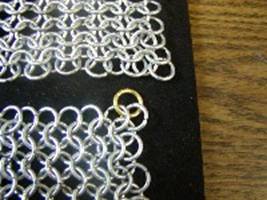
Fig.
3 Fig. 4
Connector ring on sleeve Connector
ring on body
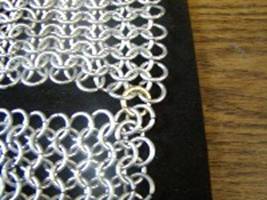
Fig. 5
Connector ring on both
Now just continue connecting the two pieces this way until you reach the end of the seam (Fig. 6). It’s just that easy!
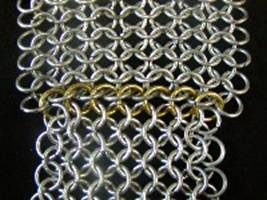
Fig. 6
Armpit seam finished
6-in-1 to 4-in-1 Connections
This is a seam you’ll see most often on maille standards, where the neck is made of 6-in-1 for greater protection, while the mantle piece is 4-in-1 for flexibility.
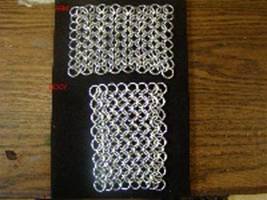
First, start with a strip of 6-in-1 maille (Fig. 7). You want this piece to be at least long enough to fit around your neck over your gambeson. We’re using a substantially shorter piece here for clarity.
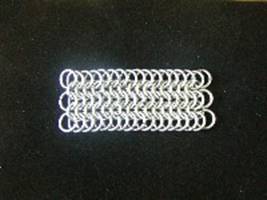
Fig. 7
6-in-1 row
Next, count the number of rings in the bottom row. Divide this number by two, and that’s how many basic units you’ll need in the 4-in-1 strip. Note that the 4-in-1 strip will be considerably longer than the 6-in-1. This is natural.
Now, to connect the two, we’ll do something similar to what we did with the armpit seam, in that the connecting rings will follow the pattern of each side it connects. In this case, each connecting ring will pass through 3 rings on the 6-in-1 side, and 2 rings on the 4-in-1 side (Fig. 8-10).
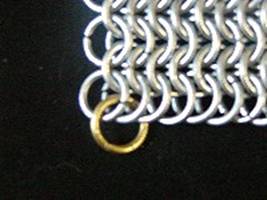
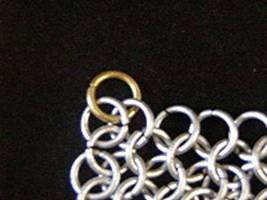
Fig. 8 Fig. 9
Connector ring on 6-in-1 Connector
ring on 4-in-1

Fig. 10
Connector ring on both
Continue connecting the two strips like this, and you’re done (Fig 11)! Note that for a maille standard or hauberk collar, you’ll need to add expansion rings before continuing the mantle (Fig. 12).
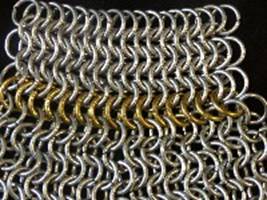
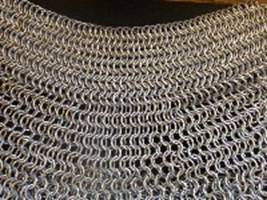
Fig. 11 Fig. 12
6-in-1 to 4-in-1 seam
Finished standard
Half-Persian 4-in-1 to European 4-in-1 Connection
Ok, say you want to add a Half-Persian 4-in-1 trim to a maille hauberk. This odd connection is actually easier than it looks. The first thing you have to note is that a Half-Persian chain (heretofore referred to as HP) of the same size rings as your hauberk will be a much denser weave (Fig. 13). As a result, the HP trim will contract the maille at the hem (Fig. 14).
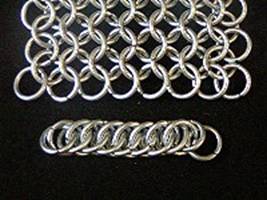
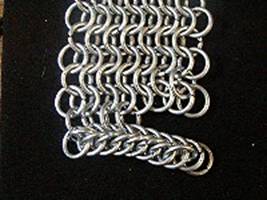
Fig. 13 Fig. 14
Euro 4-in-1 (top) and HP 4-in-1 (bottom) Dense
connection
To get around this, and give our project a nicer appearance, we’re going to use ½” I.D. rings for the HP trim (Fig. 15). This will give the trim more flexibility to connect to the Euro 4-in-1 without contracting.
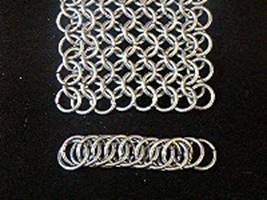
Fig. 15
½” HP Trim
Connecting the two is easier than it may appear at first. Note that on the HP 4-in-1 chain, there’s two rows of rings interlocked. In each row, the rings overlap in a particular direction (Fig. 16). What you want to do is note which direction your bottom row of rings is overlapped. Next, look at the bottom row of maille on your Euro 4-in-1 piece (Fig. 17). Which way do the rings overlap?


Fig. 16 Fig. 17
HP 4-in-1 overlap Euro
4-in-1 overlap
Now, if the Euro 4-in-1 and the HP 4-in-1 are overlapped in opposite direction, merely add a row of rings to the bottom of your Euro 4-in-1 piece. On the other hand, if the Euro and HP overlaps are both in the same direction, then your problem is solved. Simply connect the two exactly as you would two pieces of Euro 4-in-1, just disregard the top row of rings on the HP 4-in-1 (Fig. 18). Continue to connect the two in this manner, and you’re done (Fig. 19)!
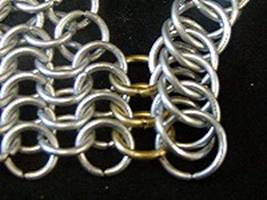
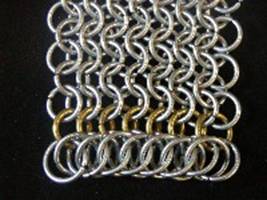
Fig. 18 Fig. 19
Connecting HP 4-in-1 to Euro 4-in-1 Connection
completed
Well, that about wraps it up for the kinds of tricky seams you’ll commonly encounter as a mailler. I hope you’ve enjoyed this presentation as much as I enjoyed writing it. Thank you for joining me for another month of “Blackmaille”!
Speaking of which, this might be the last monthly article for the “Blackmaille” site. All of the previous articles were written months in advance of their being posted, and I’ve reached the end of my “stockpile”. This won’t be the last “Blackmaille” ever (I learned my lesson last time!), but future articles probably won’t be on a monthly basis. I’ll continue to produce new articles as they come to me, though, so check back here regularly. In the meantime, there are the past articles for you to review, and keep an eye out for my new book, “Chainmaille in the Current Middle Ages”, coming soon!
Yours in Sword and Service,
Lord Thomas the Black
of House Leatherwolf
Rogue #693, Merc #373
“Artifax Ars Monstret”
Back to the Blackmaille Webpage
Back to the Cúm an Iolair Information Webpage
Articles: ©2003, 2004, 2005, 2006
Thomas Becket/Lord Thomas the Black
Hosting: ©2003, 2004, 2005, 2006
Ron Knight/Modar Neznanich
e-mail: modar@everestkc.net