BLACKMAILLE
Part 5 - Tools of the Trade
by Lord Thomas the Black
BLACKMAILLE
TOOLS OF THE TRADE
Welcome back for another installment of Blackmaille! And so, without further ado…
Ok, so we've discussed the different types of wire to use, and last month we talked about how to clean them. So now that you have your wire, and it's all shiny, now what? Now we start choosing how we're going to go about bending that wire to our will and forcing it into recognizable mail! And how do we do that? As my girlfriend once said, "You're not an ape! Use a tool!" Tools! What a brilliant idea…
The basic tools needed for mail are two pairs of pliers for opening and closing your rings, a mandrel for coiling your wire, and cutters for cutting the rings. For riveted mail, there are some specialty tools involved, which I'll get to later.
PLIERS
Pliers will be one of your most useful tools. Actually, pliers will be two of your most useful tools, as you'll need two pairs for most mail projects. There are many types of pliers, and the kind you choose will depend somewhat on your project and materials, but for the most part it'll depend on your personal preference.
Needle-nose - Needle-nose pliers come in many different sizes, and have long, tapering jaws. Needle-nose pliers are useful for small rings or tight weaves, where a regular set of pliers' jaws may not fit. Some smaller needle-nose pliers even have smooth jaws for working with jewelry wire. No teeth means no scratches in the metal.
Linesman's - Linesman's pliers are boxy-looking pliers with square jaws. They also come in many different sizes, and are most useful for heavy-gauge wire or harder wire like welding rod alloys, or some types of stainless steel.
Slip-lock - These are the most common household pliers found. They come in different sizes as well, and have lots of uses. They'll work for most types of metals, and are among the most comfortable types of pliers available. This can be important when mailling for long stretches at a time.
Jeweler's - Jeweler's pliers are smaller than most others, and are only intended for softer wire or precious metals. There are many different types of jeweler's pliers, and some can be very specialized, having oddly-shaped jaws for specific purposes. Jeweler's pliers' jaws are usually very smooth to avoid marring the surface of precious metals.
MANDRELS
I'll go into mandrels in greater depth in a future column, but for now, it's enough to say that you'll need one for turning your wire. There are three basic kinds:
Machine-assisted
Crank

Hand Mandrel
CUTTERS
These, too will be discussed in greater depth in a future article. For now, we'll just touch on them a little. There are several types of cutters, and they all make different-shaped cuts. Some of these will be better for butted mail, some better for riveted.
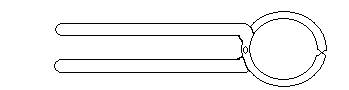
Hammerhead Snips - Also called "tile nippers", "hoof nippers", "end snips", "carpenters snips", etc. I've heard so many names for these things that when I go to buy a new pair, I just take a picture with me. These are among the most common cutters used for mail. They look like this:
Aviation Shears - These are good for butted mail, as you can cut several rings at once, and the ends will be sheared flat. The drawback is that the kerf on the rings will be bigger than with most other cutters. This can be a problem in heavier-gauge rings.
Diagonal Cutters - Mostly used for electronics repair, these are good for smaller-gauge wire. They leave a V-shaped end on the rings, though. This V shape will have to be filed down before being used for butted mail.
Mini Bolt Cutters - Perfect for heavier gauge wire or harder wires (like some stainless alloys). Leaves flat ends to the cuts, but can be difficult to use on smaller rings.
Jeweler's Saw - Advantages: leaves flat ends; doesn't take much material, leaving a small kerf. Disadvantages: slow, difficult to use, and the blades break easily.
RIVETED MAIL TOOLS
Riveted mail is a whole different animal from regular butted mail. It involves all the same steps as butted mail, and then some. Riveted mail also uses some tools and pieces of equipment not used in butted mail manufacture.
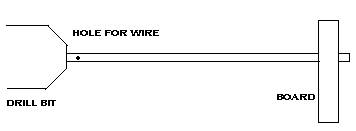
Punch Tongs - There are several ways to punch the rivet hole in your rings, but using a punch set into a pair of tongs is the easiest form by far.
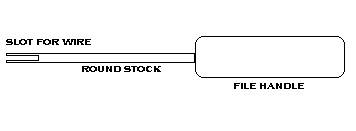
Rivet-Setting Tongs - At its simplest, this is merely a set of tongs with two indentations in one of the jaws. One is a deep indent, for setting the rivet into the ring, and the other is a shallow dent for peening the rivet over, much like the indents on a stapler.
Ring Flattener - In order to cleanly punch the holes for the rivets, you'll have to flatten at least part of the ring where it overlaps. There are two ways of doing this. The first is to simply hammer the overlap flat. This is difficult, and can result in unusable rings, where the ends skip off of each other. The other option is to use a ring flattener. I use one from DeCordene' Wireworks ( www.dcwireworks.com ).
Anvil - You don't need a very big anvil for mail, and most armorers will have their own preferences here anyway. I use a 22lb cast anvil from Harbor Freight tools (only $22.00).
Anvil Stand - There are probably as many different anvil stands as there are anvils. The important thing to keep in mind when choosing one is the weight of your anvil. Too small a stand, and it could buckle under the anvil's weight. I use a short section of log, planed flat on the top for the anvil.
Hammer - Again, there are many types to choose from. Ideally, you want one with a flat face, and enough weight to mash the rings in a few strokes. I use a 3lb cross-pein hammer ($5.00 or so from Harbor Freight).
STORAGE
I'll go into ring storage in a future article, too. For now, however, you'll need something to carry your tools, rings, and current projects around in. In my experience, there are three main methods for doing this that top the list. Which one you choose will depend entirely on your personal preference.
Tool Box - This is an obvious choice. I recommend one with a lift-out tray for the tools, and space underneath for rings and projects.
Tackle box - Another good choice, especially for jewelers. The segregated trays can hold lots of different sizes/colors of rings, and most tackle boxes have a space for your tools, as well.
Wooden chest - I do a lot of demos, so this is what I use. Smaller boxes inside let me keep my gear sorted, and it keeps the non-period stuff out of sight. Wooden chests come in many different forms, and most can be decorated with your coat-of-arms, to personalize it.
Well, that wraps it up for this edition of Blackmaille. I promise to go further in depth on some of the subjects I touched on here in future editions. As always, send your mail-related questions to:
Blackmaille
c/o Tom Beckett
6522 E 125th St, Apt 2
Grandview, MO 64030
Next month: Mandrels and Coiling
See you next month!
Back to the Blackmaille Webpage
Back to the Cúm an Iolair Information Webpage
Articles: ©2003, 2004, 2005, 2006
Thomas Becket/Lord Thomas the Black
Hosting: ©2003, 2004, 2005, 2006
Ron Knight/Modar Neznanich
e-mail: modar@everestkc.net