
BLACKMAILLE
Part 53 - Project: Japanese Candlehanger
by Lord Thomas the Black
BLACKMAILLE
Project: Japanese Candle Hanger
Welcome back to another edition of Blackmaille!
This month, I thought I’d try something different. Over the last four years, I’ve walked you through the basics, history, and various other aspects of maille. This month, I thought we’d tackle an actual project!
For a first project, I tried to think of something relatively easy. I’ve made these candle hangers before, in a couple of different configurations, and the Japanese style is by far the simplest.
For this project, you will need:
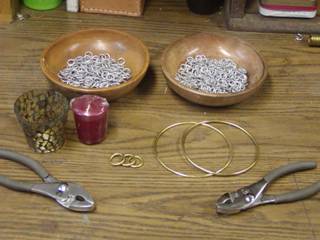
*NOTE: A lot of sources will tell you not to heat galvanized steel, because of the poisonous zinc oxide gasses given off. In my experience with these types of candle hangers, votive candles generally don’t put off enough heat to affect the galvy any.
Ok, math time: for the top and bottom of your candle hanger, you’re going to make four triangles of Japanese 6-in-1 maille. Dividing a 6” diameter hoop into four segments gives you a measurement of 4.7” (6” x 3.14 = 18.84. 18.84/4 = 4.71). We’ll just round that up to 5” per segment. This will allow it to hang loose. This will be measured from the outside of the outermost flat rings. The bottom of these segments will be .75 (1” x 3.14 = 3.14. 3.14/4 = .785, rounded to .75 for ease of use). This end will connect to the brass rings at the top and bottom of the hanger. This will result in a roughly trapezoidal piece of Japanese 6-in-1, made with ¼” rings (Fig. 1). Now make 7 more of these, so you have a total of four for the top, and four for the bottom (Fig 2).
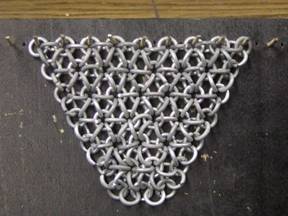
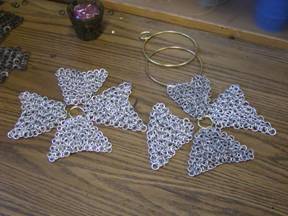
Fig.
1 Fig.
2
Note that in these pics, half of the triangles have been made with 5/16" rings as the "flat" rings. This is just an aesthetic choice, and makes no difference to these directions.
Connect the 1” brass rings to the top and bottom sections with 1/4” rings (Fig 3). Connect the four sections of each half together at the sides with Japanese 4-in-1 connections (Fig 4).

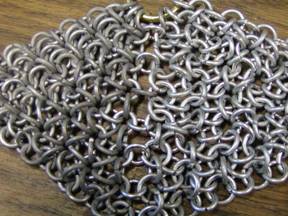
Fig.
3 Fig.
4
Next, weave four strips of Japanese 4-in-1, also using ¼” rings (Fig 5). The length of these strips is a matter of personal taste, just make sure they’re all the same length. These pieces should be about 4 rows wide, and we made ours 4” long. These will join the top and bottom pieces.

Fig. 5
Now, count the flat rings along the top row of each Jap 6-in-1 segment. This will be the number of 5/16” rings you’ll need to connect these to the brass hoops. NOTE: in ¼” rings, there’ll be about 9 rings in the top row. In the 4” 4-in-1 strips that connect the top and bottom, you only have 4 rings. There's no trick to this at all. Just connect the strip to the middle six rings in the triangle in 6-in-1 fashion with the 5/16” rings, with the brass hoop running through the middle (Fig. 6). Next, connect the strips to the top section in the same way as you did with the bottom section (Fig. 7).
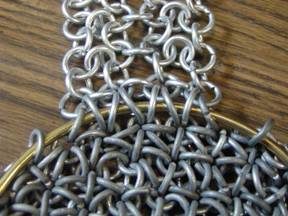
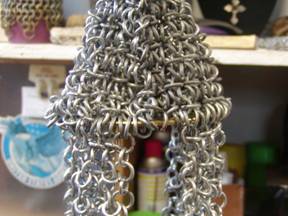
Fig.
6 Fig.
7
To make the chain to hang your candle hanger from, make a strip of Japanese 4-in-1 out of the ¼” rings, 4 flat rings wide and about 3”- 4” long (Fig. 8), then wrap it into a roughly square tube and connect the sides (Fig. 9).
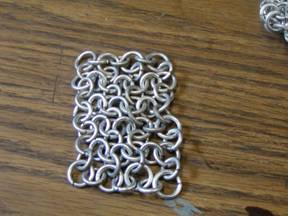
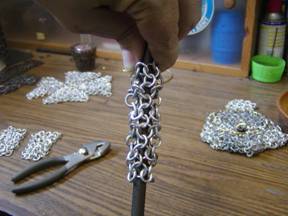
Fig.
8 Fig.
9
Next, connect this piece to the 1” brass ring at the top of the hanger as shown (Fig. 10), and attach the other end to the 3rd 1” brass ring (Fig. 11).

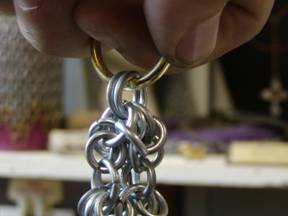
Fig.
10 Fig.
11
Finally, put your candle into the votive holder, place the holder in the bottom basket of your hanger, light and enjoy (Fig. 12)!
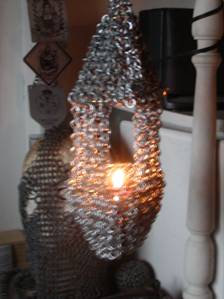
Fig. 12
Well, that wraps it up for Blackmaille’s first project article! Being as this article is going online in January (just in time for 12th night celebrations), I may make this an annual feature, with a different candle-hanger being featured every year. It's all up to you! If I get enough demand for it, it'll become a regular feature. In the meantime, thanks for joining us for another month. As usual, any hate mail, fan mail, question, comments, or suggestions for other projects can be sent to:
Blackmaille
c/o Tom Beckett
13628 Belmead Ave
Grandview, MO 64030
Or you can email them to me at: tbeckett1@kc.rr.com
See you next month!
Back to the Blackmaille Webpage
Back to the Cúm an Iolair Information Webpage
Articles: ©2003, 2004, 2005, 2006,
2007, 2008
Thomas Becket/Lord Thomas the Black
e-mail questions & comments to:
tbeckett1@kc.rr.com
Hosting: ©2003, 2004, 2005, 2006, 2007, 2008
Ron Knight/Modar Neznanich
e-mail: modar@everestkc.net