BLACKMAILLE
Part 62 - Maille Repairs
by Lord Thomas the Black
BLACKMAILLE
Maille Repairs
Welcome to another month of Everyone’s Favorite Maille-Related Monthly™: “Blackmaille”!
This month, I thought we’d discuss a common problem with butted maille. I’m talking about “maille-moths”, and how to fix them. “Maille-moths” are those little holes that butted maille sometimes gets when stored improperly. “maille-moths” are unique to butted maille because of the nature of the rings. Since butted rings are just squeezed shut, sometimes the closures can open up a little, and if the openings line up right, then you get a gap in the maille. This can happen most often with maille worn in combat, such as in the SCA or LARP games. The stresses of combat can stretch or bend the rings just enough to cause a gap, and if the maille is stored improperly, then the problem is exacerbated.
Fortunately, fixing maille is relatively simple. Mostly it just takes a familiarity with the maille itself. However your maille is made, be it European 4-in-1, 6-in-1, Japanese, what have you, the more familiar you are with the way the maille is woven, the easier it will be to recognize problems. Maille in general is fairly unforgiving, and if there’s a problem, then it will be easy to spot it. It may not always be easy to see how to fix it, but it’ll be very obvious that there is a problem.
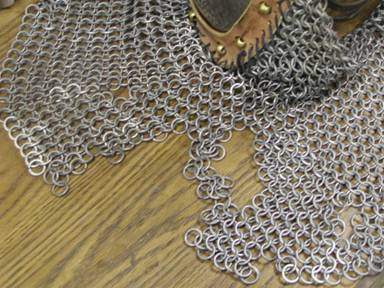
The first step in fixing maille is to lay the piece in question out as flat as possible on your workbench. This way, you’ll be able to see how the pattern lays, and more easily see the problem areas.
Fig. 1
The next step is to assess the damage. Keeping a notebook at hand might be helpful, but not necessary. Closely examine the maille, making note of both holes and any missing, squashed, damaged, or badly “pringled” rings. Remove any bad rings, and if any rings have come open and entangled any others, remove them as well. In some cases, where the maille has become badly tangled, it may be easier to remove a large area and start over.
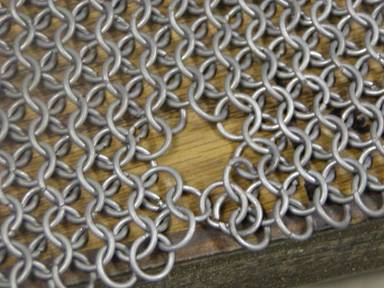
Fig. 2
Now, there are two ways you can go about fixing the damaged maille. You can go over the entire piece, as described above, removing rings as you go, until you have an inventory of damages to fix, or you can fix them as you go along. I find it’s easier and faster to fix them as you go. I generally untangle any large areas, then go over the rest of the piece, fixing holes here and there as I go, saving large areas that will need to be rebuilt until last.
Once you know what needs to be fixed, then the actual repairs are the easy part. Here’s where that familiarity with the pattern I spoke of earlier comes into play. With most holes and gaps, it will be obvious there is something wrong. If one or two rings are missing or disconnected, it may be harder to see, but it will stand out. An actual hole, with many rings missing, will stand out more. To repair these, just insert new rings of the same type (paying close attention to metal type, wire diameter, and ring size), replacing the missing rings. I find that the European 4-in-1 pattern lends itself to easier repairs, as it’s an open weave, and looks wrong if done wrong.
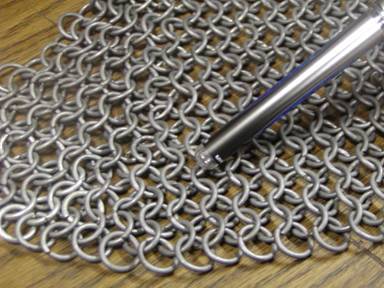
Fig. 3
When rebuilding a large hole, it helps to know how your maille was put together in the first place. For example, you may need to re-create missing expansions or seams. Each of these present its own set of problems. If you know your piece was made with expansions, for example, you can examine the overall pattern, and possibly find where other expansions were made, and how far apart they are. Most expansions are made in a regular pattern, to preserve the overall symmetry of the piece. Once you know where and how often they appear, you’ll know where the new ones need to be in the build. The easiest way to do large areas like this is to start at the top and just work your way down, row-by-row. I like to use as many of the original rings as I was able to salvage from this area, so that the repairs won’t be as obvious, but most times, you’ll just have to use new rings, and deal with the color difference until it fades.
In the event that the area needing to be rebuilt is in a large, flat area of the maille, for example, on a hauberk, then it’s possible (and sometimes easier) to just count how many units wide and long the hole is, and construct a “patch” separately. Then, you can weave it into the damaged maille when it’s ready.

Fig. 4
Seams are another story. To cite an example, the aventail pictured in this article was constructed with sections of triangles and trapezoids joined together. This left seams in the maille, which are clearly visible. In at least one place, the hole needing repair appeared around the seam. In this case, you have two options: 1.) preserve/rebuild the seam, or 2.) disregard the seam altogether and use expansions. I find the second option unfavorable, as sometimes the maille won’t line up right to expand, and besides, where seams are used, the seam is obvious, and if an expansion is used, it will be obvious where the seam used to be. It doesn’t look right. To rebuild a seam, note where the seam starts and ends, and mentally separate the hole into a left side and right side. Unlike large hole rebuilds mentioned above, work done on a seam rebuild will involve repairing the maille from the sides in to the seam (instead of starting at the top and working your way down). Other than the direction in which you’re working, the repairs are done the same way. Replace rings in the pattern, and when the seam is reached, stitch it up just as you would any other seam join, and you’re done!

Fig. 5
When all of your repairs are done, give your piece another thorough examination, making sure you got everything that needed done. Pay special attention to seams and any place where the maille is attached to leather (such as on our aventail). Fix any problems as you go, and clean up any closures that look suspect. Congratulations: you’ve finished repairing maille!
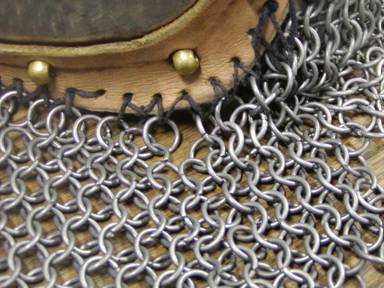
Fig. 6
Now that the repairs are finished, how do you prevent having to go through this again? That all depends on how you store and maintain your maille. SCA combat, for example, can be an exhausting, sweaty exercise, and when most fighters are done for the day, you want to go have a beer with the guys. Totally understandable, but wait. Take a moment to sit down with your armor and some tools, and make any necessary repairs first. Before it’s tossed into an armor bag, or dumped onto the floor of your tent, make sure you close or replace any rings that got bent or broken during your fighting. Clean up any rust spots (and treat mild steel with WD-40 or oil). Basic maintenance like this will only take a few minutes, and it not only prevents problems with your maille down the road, it’ll give you a few moments to cool down and relax after a hard day of fighting.
How your maille is stored can make a difference, too. If you toss your hauberk into a box at the end of the day, and don’t touch it again until the next time you fight, then you’ll have “maille-moths”, I can almost guarantee you. The best way to store your maille is rolled up in a moisture-resistant container. For hauberks, lay the maille out flat, then fold the sleeves in to the center. Fold one side over the other, then starting at the neckline, roll the hauberk up into a tight cylinder. You may want to wrap this rolled-up maille in either oiled canvas or leather. Then, keep it in a wooden or plastic trunk. For aventails, either remove the aventail from the helm and fold/roll it up like with the hauberk, or turn it inside-out in the helm, with knee/elbow pads in the helm to keep the maille from moving around too much. The more the maille moves around, the more likely any bad closures will rotate around to line up and cause a hole.
Well, that wraps it up for another edition of “Blackmaille”! Thanks for joining us for another month. As usual, any hate mail, fan mail, questions, or comments should be sent to me at:
Blackmaille
c/o Tom Beckett
13628 Belmead Ave
Grandview, MO 64030
Or you can email me at: tbeckett1@kc.rr.com
See you next month!
Back to the Blackmaille Webpage
Back to the Cúm an Iolair Information Webpage
Articles: ©2003, 2004, 2005, 2006,
2007, 2008
Thomas Becket/Lord Thomas the Black
e-mail questions & comments to:
tbeckett1@kc.rr.com
Hosting: ©2003, 2004, 2005, 2006, 2007, 2008
Ron Knight/Modar Neznanich
e-mail: modar@everestkc.net