BLACKMAILLE
Part 65 - Project: Candle-Hanger II
by Lord Thomas the Black
BLACKMAILLE
Project:
Candle-Hanger II
Welcome back to another edition of Blackmaille! With the New Year upon us, and Twelfth Night drawing nigh, It’s time for another candle-hanger project. This will hopefully become an annual feature in Blackmaille (mostly because annual features are easier to come up with , haha!), with a new candle accessory being made each year.
This month’s project is similar to last year’s
candle-hanger (see Blackmaille #_), but much less time-consuming to build. In
fact, this was the first candle-hanger I ever made, and it was done all in one
sitting (about six hours, total).
 |
|

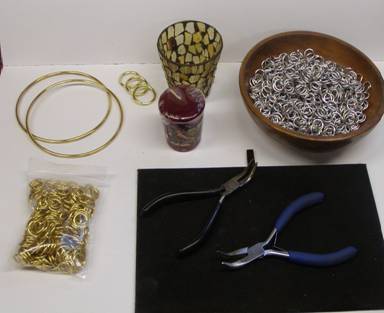
The brass hoops, votive candle, and votive holder can be found at craft stores like Hobby Lobby (where I got mine) or Michael’s. The brass and galvy rings you should have in stock. You don’t? What kind of mailler are you? Go coil and cut some. I’ll wait. Note: because I had lots left over from a previous project, I used 16g, 5/16" bright aluminum and 3/8" gold anodized aluminum instead of the galvy and brass, so your results may look slightly different than those pictured here.
A quick note on using galvanized steel: A lot of sources
online will warn strongly against heating galvanized steel rings for anything
involving fire or heat, as the galvy, when heated, can emit dangerous amounts of
zinc oxide gasses. In my experience, the votive candle used in this project
emits such a (relatively) small amount of heat, and is held far enough away from
the top of the hanger that while the maille does get warm with extended use,
zinc oxide emissions aren’t really a problem. Don’t sweat it.
Making the candle-hanger:
Before we begin, it’s important to note that the order in which some of the steps are taken depends on the equipment in your shop. If you have a vibratory tumbler available, then I would recommend making the brass spiral pieces first (see below), and letting them run in the tumbler while you do the rest, so they’re nice and shiny for the finished product. For the purposes of this article, I’m going to assume most people do not have a tumbler, and so the bit about the spiral pieces will be a little further on.
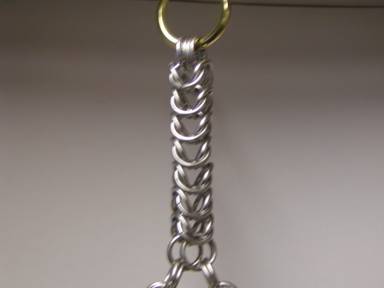
Make a strip of European 4-in-1 one Basic Unit wide, and long enough to match the outer circumference of one of the large brass hoops, with the hoop itself running through the middle rings (Fig. 1)
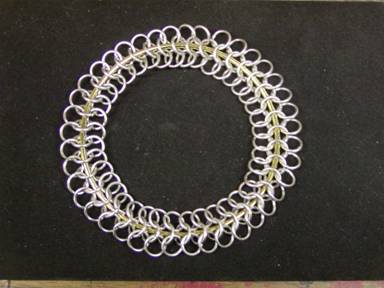
(Fig. 1)
Count the number of rings in the bottom row of your 4-in-1 strip, and divide this number by 4. If it doesn’t come out even, add a little to the strip until it does. This number will be the number of rings in each section of the top and bottom pieces.
Make four trapezoid-shaped pieces, with the above number of rings in the top row, and tapering to four rings in the bottom row. The finished piece will look like a triangle with the tip cut off (Fig. 2).
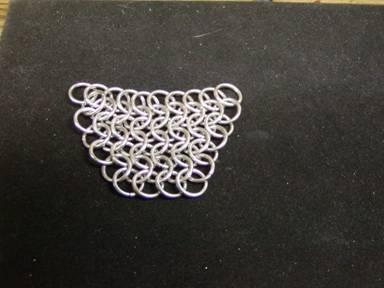
(Fig. 2)
Attach these pieces together along the 45-degree edges, and attach one of the 1” brass hoops to the bottom row of rings. Next, make four smaller triangles, 5-6 rings in the bottom edge, and attach these to the top row of your original strip, evenly spaced apart (Fig. 3)
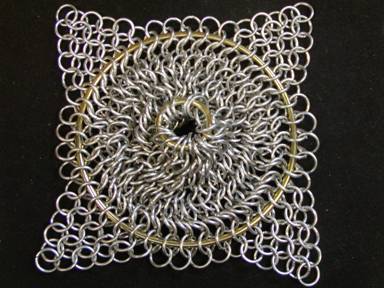
(Fig. 3)
Repeat previous steps for the top of the hanger.
Make four spiral 4-in-1 chains approximately 4”-5” long (when spiraled). If you have a vibratory tumbler (the type used to clean brass rifle casings, for example), you should do this step first. Otherwise, these can be shined up with some Brasso and elbow grease (Fig. 4).
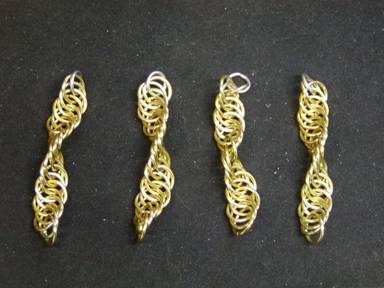
(Fig. 4)
Attach the brass spiral chains to top half of hanger through the end rings of the small triangles (Fig. 5)
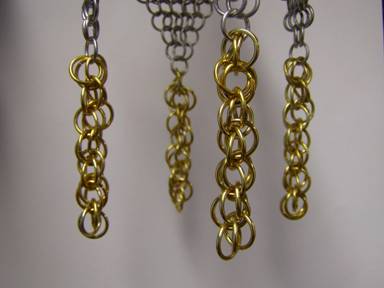
(Fig. 5)
Wind up each spiral chain, one at a time, and
attach them to the bottom half of the hanger through the end rings of the small
triangles, same as the top (Fig. 6). Connecting the chains this way will take a
little work, but the spiral chains will stay spiraled, which looks way cool when
finished.
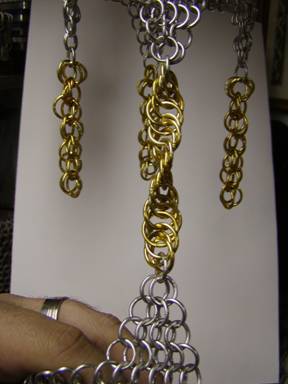
(Fig. 6)
Make either a box-pattern or full-persian chain, 4”-5” long, and connect it to the top of the candle-hanger. Attach the last brass hoop to the end to hang it from (Fig. 7).
(Fig. 7)
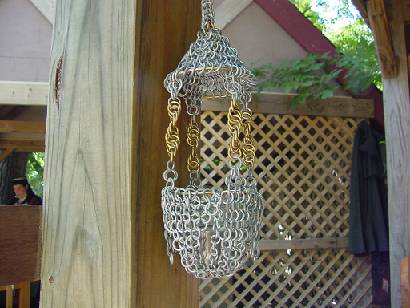
Place your votive candle in the votive holder, place the votive holder into the bottom of the candle-hanger, light and enjoy!
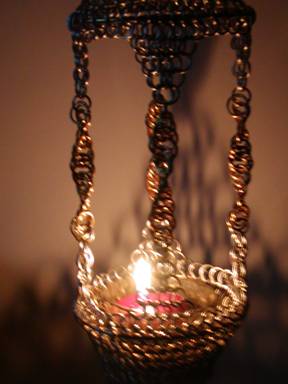
(Fig. 8)
That’s really all there is to it! Now you have a new candle-hanger to add to the one made in last year’s project article (Blackmaille #_). As Galadriel said in “Lord of the Rings”: “May it be a light in dark places, when all other lights go out…”
Thanks for joining us for another edition of Blackmaille, and Happy New Year! As usual, any questions, comments, hate mail, or fan mail can be sent to me at:
Blackmaille
c/o Tom Beckett
13628 Belmead Ave
Grandview, MO 64030
Or you can email me at: tbeckett1@kc.rr.com Subject line: Blackmaille
See you next month!
Back to the Blackmaille Webpage
Back to the Cúm an Iolair Information Webpage
Articles: ©2003, 2004, 2005, 2006,
2007, 2008, 2009
Thomas Becket/Lord Thomas the Black
e-mail questions & comments to:
tbeckett1@kc.rr.com
Hosting: ©2003, 2004, 2005, 2006, 2007, 2008,
2009
Ron Knight/Modar Neznanich
e-mail: modar@everestkc.net