BLACKMAILLE
Part 73 - Woodworking 101: Demo Tables
by Lord Thomas the Black
BLACKMAILLE
Woodworking 101: DemoTables
Welcome back to another edition of Blackmaille! For the next three months, we’re going to set maille aside and talk about some ways you can make your public demonstrations more portable, more visually interesting, and more flexible. In other words, we’ll be talking about demo tables, benches, and chests you can use for just about any kind of demo you do. This month, “Woodworking 101” will show you a very simple demo table design that breaks down for easy portability. Next month, “Woodworking 102” will cover a portable bench design of my own creation, and finally, “Woodworking 103” will show you how to make a simple Viking chest in which to carry your tools and whatnot.
For this project, you’ll need a basic understanding of tools and woodworking basics. By basic, I mean you can use power tools without hurting yourself, and that you know how to measure and cut boards. Believe me, I didn’t know too much beyond that when I started this project, and I’m fine (and surprisingly, the projects actually came out nicely!). The tools and materials we used were as follows:
MATERIALS
7 boards 1” x 12” x 6’
2 boards 1” x 2” x 6’
1 boxes wood screws, 8 x 1-1/4
1 wooden dowel, 1¼” x 36”
TOOLS
1 set instructions for tables
1 cordless screwdriver
1 cordless drill
1 jigsaw
1 circular saw
1 electric sander
1 1¼ bore bit
4 Foam paint brushes
Assorted artists paint brushes
1 Yardstick
1 Carpenters square
1 “Sharpie” marker
1 Carpenters pencil
1 Wood-burner (for crest, if desired)
2 sawhorses
OTHER SUPPLIES
Wood stain (@ least 1 can)
Spar urethane (1 gal)
Spar urethane (spray-can, for crest, if desired)
Latex paint (for crest, if desired)
Wood glue
TABLE INSTRUCTIONS
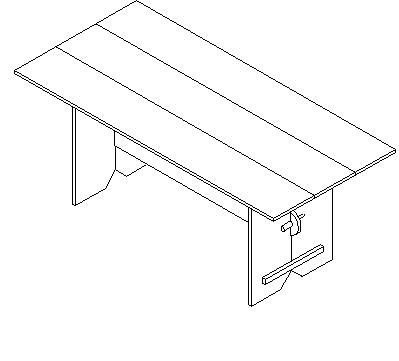
These instructions were originally taken off of the Jomsborg site (www.jomsb.org/Dirk/furniture/furniture.htm), and resulted in one table 3’ wide, 6’ long, and 30” tall. I modified the instructions into those given below, yielding two tables measuring 2’ wide, 3’ long, and 31” tall.
The basic tables shown can be put together in about 4 hours (2 hrs per table), not including staining, painting, etc. this simple design uses mostly 1 x 12 pine boards because they’re cheap, available, and pack flat.
Start by making the stretcher boards, then the legs and pegs. Once they’re done, make the top to fit the bottom.
Here’s how to cut up the seven 1” x 12” x 6’ boards that make up a pair of tables (measurements follow).

Braces:
The two 1” x 2” x 6’ boards make eight 18” braces that will be used for both the legs and the tabletop (all measurements are in inches).

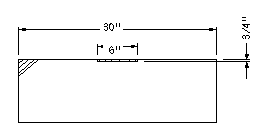
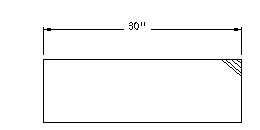
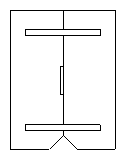
Stretcher boards:
At either end is a 6” diameter “ear” that goes through the leg and receives a peg. The hole is 1.25” and is ¾” out from the center of the “ear”. Line up the edge of the hole with the ¾” mark for a tight fit.
.
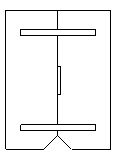
Legs:
Note that there are two kinds of leg pieces. One of each piece will yield one table leg. Be sure to line up the slotted pieces so that the slot is on the same side of the leg. These slots allow the “ear” of the stretcher board to pass through. The bottom edge of the leg should be cut to make feet. The shape should be decorative enough to please you, but more important, the feet help keep the table from rocking on an uneven floor.
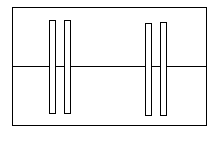
Assembled leg:
Line up the notches, clamp the boards together and screw down a pair of the 18” braces to keep the leg in one piece. Here’s what they should look like.
Pegs:
I cut my pegs from a 36” dowel rod 1.25” in diameter. Each peg is cut about 4.5” in length, so a single 36” dowel will yield all four pegs needed for two tables, with some left over.
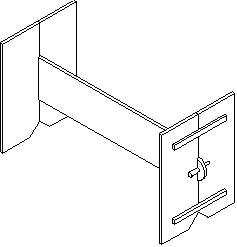
Assemble the bottom:
When you’ve got all the parts cut out and put together, it’s time to assemble the stretcher board and legs, then center these on the table top boards to mark where they’ll sit. Here’s what the assembly should look like:
Build the top:
The tabletops are simply one 1” x 12” x 6’ board cut in half (36” to a side), then laid side-by-side. Line up the boards upside down and clamp them together. Center the legs on the underside of the table and mark where the outside edges of the legs fall. Place two of the 18” braces on these lines and screw them down. If you so desire, you can repeat this on the inside of the legs, but be sure to leave some “wiggle room”, as everything will fit slightly tighter after the tables are stained and finished. Here’s what the underside of the tabletop should look like when you’re done.
That’s it! Congratulations. Now go back and do the other table the same way.
When the tables are finished, any design you want on them (such as a coat-of arms or other heraldic device) should be drawn on in pencil, then burned in with a wood-burner. After that, the table can be stained whatever color you like. For our demo tables, I stained each table a different color, to color-code them (because of that “wiggle room” I mentioned earlier, every table fit together slightly differently). Once they were stained, tape around the burned-in design and paint with a white basecoat, then when that dries, you can paint it with normal artists’ paints.
Once the paint is dry, I recommend two coats or so of spray-on spar urethane, just over the painted design. The reason for this is to protect the painted design when you go to brush on the overall coat of spar urethane. I recommend using spar urethane on all these tables and benches, to protect them from weather, humidity, and damage.
After the spray-on urethane is dry, brush on at least one coat of spar urethane. I recommend using at least two coats for the tabletop, as that will get the most weathering. Be sure to do this in a well-ventilated room, as the fumes from the urethane will make you sick.
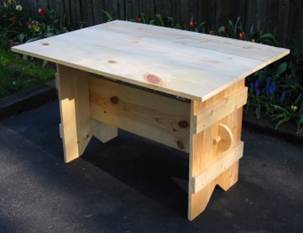
So that’s it for “Woodworking 101”! Wasn’t that fun? These tables have served us well at both the Kansas City Highland Games and at our annual Kansas City Renaissance Festival demonstrations, as well as being carted to SCA demos and fighter practices for the last two years now, and were a huge improvement over the tables provided at the KC renfest before. In addition to looking better and being more stable, they’re collapsible, so we can take our entire demo with us when we do other events, without sacrificing anything in terms of workspace, and without requiring the demo venue provide tables for us.
Thanks for joining us for another month of Blackmaille! Tune in next month, when we make some benches to go with our new tables. Until then, as usual, any questions, comments, hate mail, or fan mail can be sent to me at:
Blackmaille
c/o Tom Beckett
13628 Belmead Ave
Grandview, MO 64030
Or you can email me at: tbeckett1@kc.rr.com
See you next month!
Back to the Blackmaille Webpage
Back to the Cúm an Iolair Information Webpage
Articles: ©2003, 2004, 2005, 2006,
2007, 2008, 2009
Thomas Becket/Lord Thomas the Black
e-mail questions & comments to:
tbeckett1@kc.rr.com
Hosting: ©2003, 2004, 2005, 2006, 2007, 2008,
2009
Ron Knight/Modar Neznanich
e-mail: modar@everestkc.net