
BLACKMAILLE
Part 74 - Woodworking 102: Benches
by Lord Thomas the Black
BLACKMAILLE
Woodworking 102: Benches
Welcome back to another edition of Blackmaille! Last month, we showed you how to make portable, collapsible demo tables. This month, we’ll make a couple of benches to sit on at those tables! Unlike the tables, these benches are entirely my own design, and also unlike the tables, these benches don’t fold up for storage. They’re fairly small, though, so that isn’t a huge deal.
As with last month’s article, this month’s
project assumes you can measure and cut boards and use power tools without
hurting yourself, so if you still have all your fingers from last month, let’s
get started. As with the tables, the materials and such required are as follows:
MATERIALS
3 boards 1” x 12” x 6’
1 boxes wood screws, 8 x 1-1/4
TOOLS
1 set instructions for benches
1 cordless screwdriver
1 cordless drill
1 jigsaw
1 circular saw
1 electric sander
1 1¼ bore bit
4 Foam paint brushes
Assorted artists paint brushes
1 Yardstick
1 Carpenters square
1 “Sharpie” marker
1 Carpenters pencil
1 Wood-burner (for crest, if desired)
2 sawhorses
OTHER SUPPLIES
Wood stain (@ least 1 can)
Spar urethane (1 gal)
Spar urethane (spray-can, for crest, if desired)
Latex paint (for crest, if desired)
Wood glue
BENCH INSTRUCTIONS
As I said before, these benches are my own design, and are based very loosely on the tables shown last month. They don’t break down, but are easily portable. Both benches measure 36” long, 12” wide, and 19” tall, making them a good fit with the tables shown last month. You’ll need 3 pine boards, 1” x 12” x 6’ for these two benches.
Here’s how to cut the boards:
Tops:
Braces:

Legs:

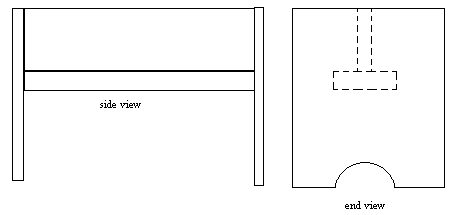
The holes in the leg pieces should be about 6” in diameter, but can be any design you like. These will form the feet of the benches.
Assembling these pieces is simple. First, take on of your 24” x 12” braces, and glue it to one of the 24” x 6” pieces. Center the 24 x 12 on the 24 x 6, making an upside-down T-shape. When the glue dries, screw the pieces together for added strength. These will be your bench supports.

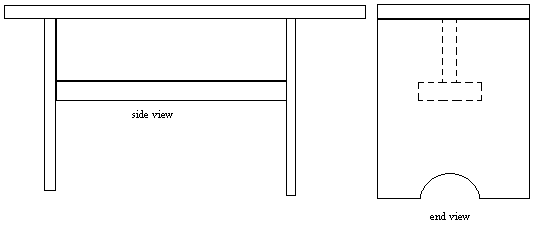
Next, lay one of the leg pieces on its side, and stand the support up on it, lining up the top edge of the 24 x 12 with the top edge of the leg. Glue these together, and when the glue dries, screw them together. Repeat with the other side. The finished assembly should look like this:
Finally, turn one of the bench tops upside-down, and lay this assembly upside-down on top of it. Glue the leg assembly to the top, and when the glue dries, flip the whole thing over and screw down the top to the assembly. When finished, it should look like this:
Now repeat the above steps for the other bench. Once the benches are completed, they can be burned, stained, painted, and finished the same way as last month’s tables.
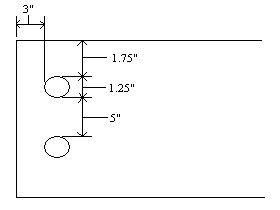
If you want to make it a little easier to carry the benches (since they don’t break down like the tables), you can cut hand-holds in the ends of the tops where they overlap. Be sure to do this BEFORE any staining or finishing takes place. Simply drill two holes 1.25 in diameter, approximately 5” apart, and about 3” in from the edges. These measurements don’t have to be exact, just make the handles comfortable for your hands, and centered (more or less) on the overhanging part of the seat.
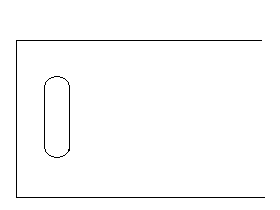
Finally, using your jigsaw, make two straight cuts between the holes, leaving one long oval-shaped hole. Thoroughly round off the edges of this hole with your sander, and you’re done! Finish the benches like normal.
So that’s it for “Woodworking 102”, and another month of Blackmaille! Thanks for joining us. Next month is “Woodworking 103”, which wraps up our three-part woodworking digression with directions for making a Viking chest for carrying your demo in. Until then, as usual, any questions, comments, hate mail, or fan mail can be sent to me at:
Blackmaille
c/o Tom Beckett
13628 Belmead Ave
Grandview, MO 64030
Or you can email me at: tbeckett1@kc.rr.com
See you next month!
Back to the Blackmaille Webpage
Back to the Cúm an Iolair Information Webpage
Articles: ©2003, 2004, 2005, 2006,
2007, 2008, 2009
Thomas Becket/Lord Thomas the Black
e-mail questions & comments to:
tbeckett1@kc.rr.com
Hosting: ©2003, 2004, 2005, 2006, 2007, 2008,
2009
Ron Knight/Modar Neznanich
e-mail: modar@everestkc.net