BLACKMAILLE
Part 75 - Woodworking 103: Viking Chest
by Lord Thomas the Black
BLACKMAILLE
Woodworking 103: Viking Chest
Welcome back to another edition of Blackmaille!
This month, we’re rounding out our three-part series on basic woodworking projects for your demos with an immensely useful project: a six-board Viking chest. This is an easy project, and in fact, was the first woodworking project I did in the SCA. I needed a box to carry stuff in to/from demos and events, and this chest fit the bill. Also, it can be used as a table or stool at the demo/event.
Funny story: when I first joined the SCA, I did leatherwork. I couldn’t get any recognition for it, though, because everyone in my area did leatherwork. So I switched to maille. For a long time, I couldn’t get recognition for that either, because everyone had done maille at one time or another, and no one needed it for fighting. So, one day I half-ass one wooden box together, and the next thing I knew, I had people lined up around the block for them! I must have cranked out ten of them in less than three months!
Anyway, the six-board chest gets its name because it only takes six lengths of 1”x 12” board to put together. Two for the ends, two for the front and back, one for the bottom, and one for the lid, and you’re done. Furthermore, this chest can be decorated to fit in with any number of time periods, and that decoration can be as simple as staining the wood, all the way to elaborate carvings and details, depending on your period and level of artistic ability.
Quick note: for my chests, I followed the instructions written by John V. Lambert at http://ourworld.compuserve.com/homepages/J_Lambert/chest.htm These directions are my interpretation of his, while the pictures are mine. Feel free to visit the source material.
List of Materials
1 1”x12”x8’ pine board *
1 pr. 2”x3/4” hinges
1 hasp (optional)
2 doz. #6x1” wood screws
Elmer’s wood glue
Wood stain
2 brass screw eyes
18” sm brass chain
Artist’s paints (such as Basics brand water-based) **
Spar urethane
* two 4-ft boards can be used instead, but be sure to match them for uniform appearance.
** if you want to add a coat-of –arms or other painted decoration to the box.
Tools Needed
Jigsaw
Circular saw
Drill
Screwdriver
Wood carving tools *
Wood burner *
* for decoration, if desired
Instructions
The first thing to note is that a 1” x 12” board is actually ¾” x 11 ¼”. I have no idea why they measure them like that. Professional carpenters must like to have to do a lot of math to make things fit right. Anyway, with this in mind, follow this cutting diagram:
The 8-ft board is first cut in half (skip this if you used 2 4-ft boards). Next, cut a 15” piece from each half for the chest ends. Then cut the remaining boards in half for the top, bottom, front and back. You should now have two 15” boards, and four 16.5” boards.
Select the worst board of the 16.5” pieces for the bottom, and cut 1½” off of the length, and 1½ off of the width. Then select the best 16.5” piece for the top. Set these two boards aside for now.
For the ends, front, and back, we’re going to make half-lap joints to join them together. Look at the 15” boards and the other two 16.5” boards’ grain. The end boards’ grain should run up-and-down, while the sides should run sideways (see diagram below). Cut a piece ¾” wide by 5½” long from both sides of the tops of the end boards, allowing about 1/16” for the saw blade, and do the same from each side of the bottoms of the from and back boards (See diagram).
At this time, go ahead and cut the arcs in the bottoms of the end boards. These serve as handles for lifting and carrying the chest, and help it sit more evenly on uneven ground. The easiest way to do this is to center a round plate on the bottom of the board, and trace it. Then, cut the semicircle out with your jigsaw.
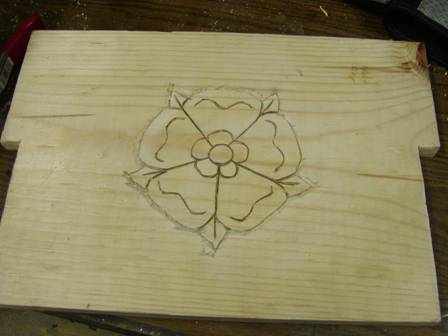
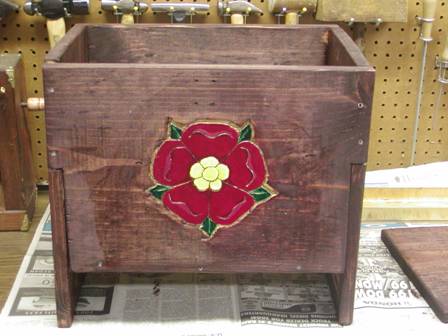
At this point, you’re done cutting the wood. If you want to add a carved or wood-burned design, now’s the time to do that. If you’re putting on a coat-of-arms, household badge, or other painted design, I recommend transferring the design to the wood at this stage, and wood-burning it in. That way, the finished design is still visible after the box has been stained, and can then be painted.
Finally, we come to the assembly. This took the most work for me, as I’m impatient, and wanted everything done NOW. It takes at least three days to finish one of these: 1 day of cutting and assembly, 1 day of staining and painting, 1 day of finishing. Also, I recommend gluing the pieces together before drilling and screwing them together. This gives the finished chest more strength and stability, not to mention it’s a lot easier to put together.
First join the front and back to the ends. Use two screws for each side of the half-lap joint, spacing them about 3/8” from the ends. Drill guide holes for the screws, then put the screws in (this makes the screws go in easier).

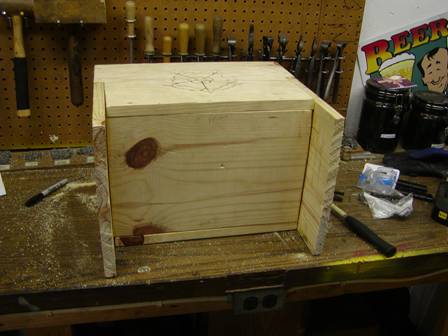
Once the ends and sides are joined, put the bottom into place. If done right, the fit should be tight. You may need to sand the edges a little, and tap it into place with a rubber mallet. Go slow and don’t force it, or you’ll break the boards. If you cut a little too much off the length or width, you can patch the gaps with wood putty later. Drill and screw the bottom into place.
NOTE: if you don’t like the looks of the screw heads, you can always counter-sink the screws, and cover them with wood plugs (this is what J.V.L. recommends).
Finally, join the top to the chest with the hinges and attach the optional hasp. If you’re concerned with authenticity, note that strap hinges and peined-over nails would be more accurate. The choice is yours. I attach the hinges now, then remove them for the staining and finishing stage.

There are many ways to finish wood. First, sand the box all over, to round off the sharp edges, and to prepare the wood for the finish. For the finish, I prefer to use Miniwax brand wood stain (I like the Red Oak color, in particular), then I coat the chest with spar urethane to weatherproof it (important if you do a lot of outdoor demos). If you have designs to be painted, stain the box first, then paint the designs. Then use a spray-on spar urethane over the painting. Once that dries, then coat the entire box with the brush-on urethane. The spray urethane will protect the painted design from the paintbrush used for the final urethane coating.
After the finish has dried, re-attach the top, hinges, and hasp. Depending on the hinges, you might want to add a small chain to keep the lid from falling back and pulling them loose. Attach one screw eye on the inside of the box, on one end near the front. Attach the other to the top so that when the box is closed it is inside the chest and in line with and just behind the first eye. Open the top to the maximum desired position and measure and cut the chain. Open the eyes slightly and attach the chain.

NOTE: The tray shown is not covered in this article, as this particular box was one I custom-made for my wife, Sarah.
Your chest is now complete, and should give you years of service! I’ve had my first one for about six years now, and it’s still going strong. The only care it requires is a periodic wiping with a cloth.
Thanks for joining us for another month of Blackmaille! As usual, any hate mail, fan mail, questions, or comments can be sent to me at:
Tom Beckett
13628 Belmead Ave
Grandview, MO 64030
Attn: Blackmaille
Or you can email me at: tbeckett1@kc.rr.com
See you next month!
Back to the Blackmaille Webpage
Back to the Cúm an Iolair Information Webpage
Articles: ©2003, 2004, 2005, 2006,
2007, 2008, 2009
Thomas Becket/Lord Thomas the Black
e-mail questions & comments to:
tbeckett1@kc.rr.com
Hosting: ©2003, 2004, 2005, 2006, 2007, 2008,
2009
Ron Knight/Modar Neznanich
e-mail: modar@everestkc.net