BLACKMAILLE
Part 91 - How-To: Demo Boards, Pt.2
by Lord Thomas the Black
BLACKMAILLE
How-To: Demo Boards, pt 2
Welcome back to another edition of Blackmaille!
Last month, we began working on our demo boards, an indispensable piece of equipment for any public demonstration. This month, we’ll continue our work by making the demo pieces and labels for our boards.
Tools/Materials Needed:
2 pr needle-nose pliers
2 sheets self-adhesive lamination
1 pr scissors or a desktop paper-cutter
Computer –w- word processing program
Printer
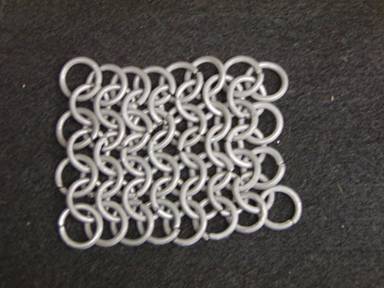
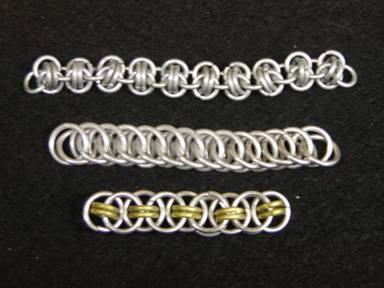
Once the boards themselves are done, it’s time to start on the displays. Take your list of weaves you want to use, and make samples of each weave. For weaves like 4-in-1 and 6-in-1, a piece around 2” square should do.
This will give a good example of the weave, allowing your patrons to see how it’s put together, and giving a good idea of what a larger piece (like a coif or hauberk) will look like.
NOTE: Make sure your closures are good and tight, as this will be important later on when we attach the samples to the demo boards.
For chain weaves (Helm Chain, Byzantine, etc), a 2” length should suffice.
Lay your pieces out next to the boards, and arrange them so that they’ll fit. Keep in mind, you’ll need to leave room for the labels, so you may need to cut a few weaves from the list if you don’t have room for them. Depending on the size of your pieces, you should have room for 6-7 samples on a 24”-long board.
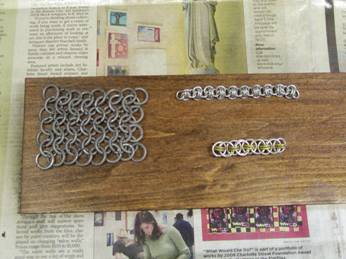
Mine came out like this:
Historical Weaves Modern Weaves Jewelry Weaves
4-in-1 8-in-1 Box
6-in-1 King’s Maille Byzantine
Half-Persian Scale maille (front) Orbital
Spiral Scale maille (back) Helm chain
So-Gusari Orc-maille Dragonscale
Hana-Gusari Weta-Tenzan sample Trizantine
Riveted Full-Persian
There is one less weave on the Modern Weaves board because the Orc-maille and Weta-Tenzan samples came out larger than the others, so there was less room. On the other hand, I probably could have fit more jewelry weaves onto their board, since both the labels and samples were smaller then the other weaves. Maybe next year, I’ll add more to that one.
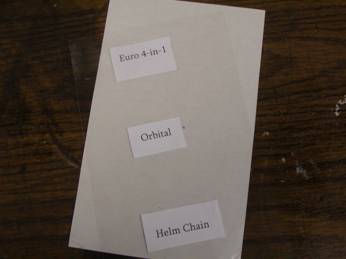
Finally (for the preparation stage, anyway), you’ll need to make your labels. Again, visibility and legibility are key here. When you type up the labels, use a large enough font that the labels can be read. As with the samples, you want your labels to be around 1” wide by 2” long or so. If you’re using Microsoft Word, the “print preview” feature will be your best friend. I used the Sylfaen font, 16 pt.
This is Sylfaen 16
You want to avoid using something like Old English font, because while it is very medieval-looking, it can be difficult for the general public to read easily. On the other end of the spectrum, a font like Times New Roman is very legible, but also looks a little sterile and modern.
This is Times New Roman 16
Space your labels out with about 2-3 lines between them, and experiment with boldface type, to see which looks best to you, depending on your font. Finally, print out your labels and get ready to make a mess of your shop!
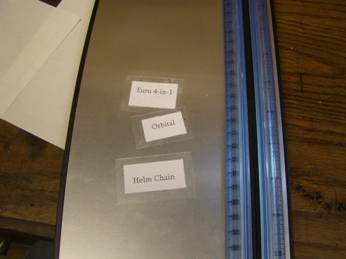
Ok, so you have your spiffy new labels. Time to cut them apart! I use a desktop paper-cutter (@ $10.00 AT Hobby Lobby) because it makes nice, straight cuts. Cut the labels apart, leaving about 1/8” around the writing.
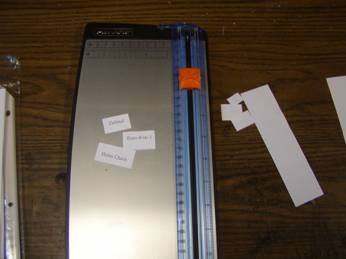
Now it’s time to weather-proof them. For this, I use self-adhesive laminate sheets, available at any office-supply store for around $6-10 per pack of 50 sheets. Take one sheet, peel the backing off, and carefully lay it face-down (NON-sticky-side down) on your workbench.

Carefully arrange your labels on the sheet, making sure to smooth them down as you place them, so there’s no air bubbles underneath. Leave about ¼” between the labels.
Next, take another sheet of laminate, peel the backing off, and carefully lay it sticky-side to sticky-side on your labels, smoothing out any air bubbles as you go, and sealing the paper labels between two layers of plastic.
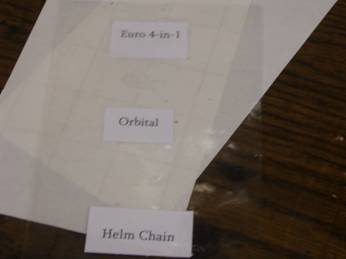
Finally, use your scissors or paper cutter to cut the labels apart, again leaving about 1/8” of plastic outside of the paper. You should be left with labels about 1” wide x 2” long.
We’ll stop here for now. Next month, we’ll attach everything to the boards, and the month after, we’ll look at the finished boards, and their impact on the demo. In the meantime, thanks for joining us for another month! As usual, any questions, comments, hate mail or fan mail can be sent to me at:
Thomas Beckett
13628 Belmead Ave
Grandview, MO 64030
Or you can email me at: tbeckett1@kc.rr.com
See you next month!
Back to the Blackmaille Webpage
Back to the Cúm an Iolair Information Webpage
Articles: ©2003, 2004, 2005, 2006,
2007, 2008, 2009, 2010, 2011
Thomas Becket/Lord Thomas the Black
e-mail questions & comments to:
tbeckett1@kc.rr.com
Hosting: ©2003, 2004, 2005, 2006, 2007, 2008,
2009, 2010, 2011
Ron Knight/Modar Neznanich
e-mail: modar@everestkc.net