ENGLISH DRINKING VESSELS:
Black
Jacks, Bottells and Other Items
(Part 1: Black Jacks)
by Modar Neznanich
I. Introduction
The existence and history of leather drinking
vessels has been firmly established. An entire book was written on the subject,
entitled Black Jacks and Leather Bottells. There are also several leather
drinking vessels that have survive from the Middle Ages. Many of these extant
pieces are located in the Museum of Leathercraft outside London, England. Other
extant pieces are on display in some of the pubs throughout England, and four
are located at Greenfield Village in Dearborn, Michigan. (I had the good fortune
to examine these last four, first hand, and was allowed to speak to several
audiences on their construction.)
II. Definition of
Terms
To make sure that it is easier to understand
the terminology used, the following definitions have been
provided.
Jack -- Also called a blackjack or a black jack. A
tankard made of leather (usually tar-coated) for holding beer or ale. The jack
received its name from its distinctive shape. The archers and guardsmen of the
time wore a gambeson-style jacket of defense that was a sleeveless coat which
came straight down the sides and flared out at the bottom, when it got to the
hips. This body protection was called a jack. Because the drinking vessel had
the same silhouette, it also became known as a jack. Over time it became known
as the black jack, because the majority of them were coated inside with a
black pitch or pine tar resin to make them waterproof. Many times erroneously
called a bottle of leather.
Bombard -- A giant-sized jack, usually with a holding
capacity of 1 to 5 gallons. Named originally after the late medieval cannon
used to hurl large stones, because both had huge openings.
Bottell -- Also called botel, botil, botill and bouteille.
The modern word of bottle derives from it. A rigid or semi-rigid container for
liquids, having a comparatively narrow neck or mouth and usually no
handle.
Can -- A cylindrical drinking vessel with straight
sides, similar to modern coffee mugs. Some had handles, some did not. A few
even had removable tops, but most had an open top.
Pot -- A generic term for any type of drinking vessel
whether made of leather, wood or metal. It is from this term that the word
"potable" (meaning suitable for drinking) comes.
Tankard -- A tall one-handled drinking
vessel.
III. Why Was Leather
Used?
The development of drinking vessels made of
leather arose from the fact that during the Middles Ages there was no glass
production and little pottery production in England. Records show that pottery
vessels (made of clay) were not as common as many believe. While the records
show there were quite a few potters in England during this time, they were
makers of metal pots. Records had a special term for those who produced vessels
from clay. They were called Erthpotters, and there were very few of them. Almost
all the earthenware vessels produced during the Middle Ages, in England, were
either large pitchers for liquids or large "urns" for preserving and storing
goods. All other glass and pottery was imported from other countries, most
notably France. (It was also noted in the records of the time that the "native"
clay vessels were inferior to the imported clay pottery, and hence less
desirable to own due to the fact that they easily broke.) The cost of importing
glass and pottery products, particularly due to high tariffs, made it
impractical for the common man to purchase them. Reasonably, people turned to
other available resources to produce needed items out of. One of the resources
used was wood. Crockware (composed mainly of dishes, plates, saucers, platters,
trenchers, some utensils and a few cups) were produced from wood. Metal was used
mainly for utensils, although there are some examples of it being used to make
plates and cups. The other plentiful resource available at the time was leather,
and most drinking vessels were made out of this.
Besides being plentiful and cheap at the
time, leather had other advantages. It could be easily made into various sizes
and shapes to fit one's need. Once coated with pitch (or other linings such as
tallow made from beef/mutton fat, pine tar resin or wax), leather remained
extremely waterproof, did not warp out of sealable shape like wood could, and if
dropped, it did not break like expensive glass and pottery.
This process of lined leather is noted by
John W. Waterer on page 92 of the book, Leather Craftsmanship, "Some of
the more spectacular of moulded articles were the drinking vessels called 'black
jacks' and their relatives, the great jugs or 'bombards'; were lined with pitch
or resin [such as wax, beef or mutton fat tallow or pine tar] to prevent liquor
from soaking into the leather and softening it."
IV. Timeline of Leather
Vessels
In an attempt to allow visualization of when
leather vessels were in use, the following rudimentary timeline has been
provided.
A rude cup of hide, dating back to the
Neolithic period, was exhumed, along with other remains, in West Smithfield,
England.
A Saxon barrow (funeral mound) located
eight miles from Buxton, England had inside the remains of a silver-edged
leathern cup. It was three inches in diameter at the mouth. It had
ornamentation of wheel shapes and crosses.
The earliest known written record
concerning leather drinking vessels in England was in the Colloquy of
Archbishop Alfric. Written in the Tenth Century, it speaks of the wares
produced by leathercrafters which included bottles, flasks and
bougets.
From Guildhall records of the
leathercrafters, we know that leather vessels were in great production by the
1300s, and that the Botellers (makers of bottles and other leather drinking
vessels) were forming their own guild, separate from the other
leathercrafters. The records show they had exclusive right to make all leather
drinking vessels.
In the 15th century, the Botelmakers Guild
and the Horners Guild combined into one guild. Perhaps showing the beginning
of a decline in the use of leather vessels.
V. Historical
Sidenotes
It is theorized that the concept of a
leather sap used to knock people unconscious, being called a blackjack, arose
from bar fights where the black jack drinking vessels were used as weapons to
fight with. As Oliver Baker states on page 99 of Black Jacks and Leather
Bottells,"In Heywood's 'King Edward IV' (1600), Sir Thomas Sellinger says,
'Now by this light! Were I but near the Knave with a black jack, I would beat
out his brains.'"
The jack was well loved by its users. So
much so that there are several songs written in period about it. One such song
recorded by Oliver Baker on page 102 of Black Jacks and Leather
Bottells goes:
"He that drinks in a Jack looks as fierce
as a Spark,
That were just ready cockt to shoot at a Mark;
When the
other thing up to the Mouth it goes,
Makes a Man look with a great Bottle
Nose:
All wise men conclude that a Jack New or Old,
Tho' beginning to
leak is, however, worth Gold;
For when a poor man on the way doth trudge
it,
His worn-out Jack serves him for a Budget;
And I wish his Heirs may
never lack Sack
That first contrived the Leather Black
Jack."
VI. Production of a
Jack
A short synopsis of the general procedure
consists of cutting out the three leather pieces needed, sewing the shell piece
and plug piece together, soaking the shell piece in water, forming the shell
over a mould, allowing the shell to dry, removing the shell from the mould,
sewing in the bottom piece, lining the insides, dyeing/decorating the exterior
and sealing the exterior.
Basic Tools
Needed:
1. Dye Daubers
2. Burnisher
3. Pressure
Clamps
4. Groover
5. Leather Knife
6. Mould
7. Needles
8.
Paper
9. Pattern
10. Pencil
11. Sandpaper
12. Spacing Wheel
13.
Stabbing Awl
Optional Tools Need (for
decorating)
1. Modeling Tool
2. Paint Brushes
3.
Stipler
Materials
Needed
1. Leather, 9/10 weight oak-tanned
2.
Leather cement
3. Thread, 6 strand flax (linen) waxed with beeswax
4.
Coating/Resin/Pitch
5. Wax Paper
6. Leather dye
7. Paint (Optional -
for decorating)
8. Lacquer
Step-By-Step
Instructions
1. Determine the shape and size desired.
Most jacks in period were of quart-size, and shaped like the jack
"standardized" by Master Trobere Oakseed from the vessels illustrated in the
book Black Jacks and Leather Bottells by Oliver Baker. It is this
style of jack that will be discussed here. Variations in shape and size will
not affect the steps needed to produce a jack.
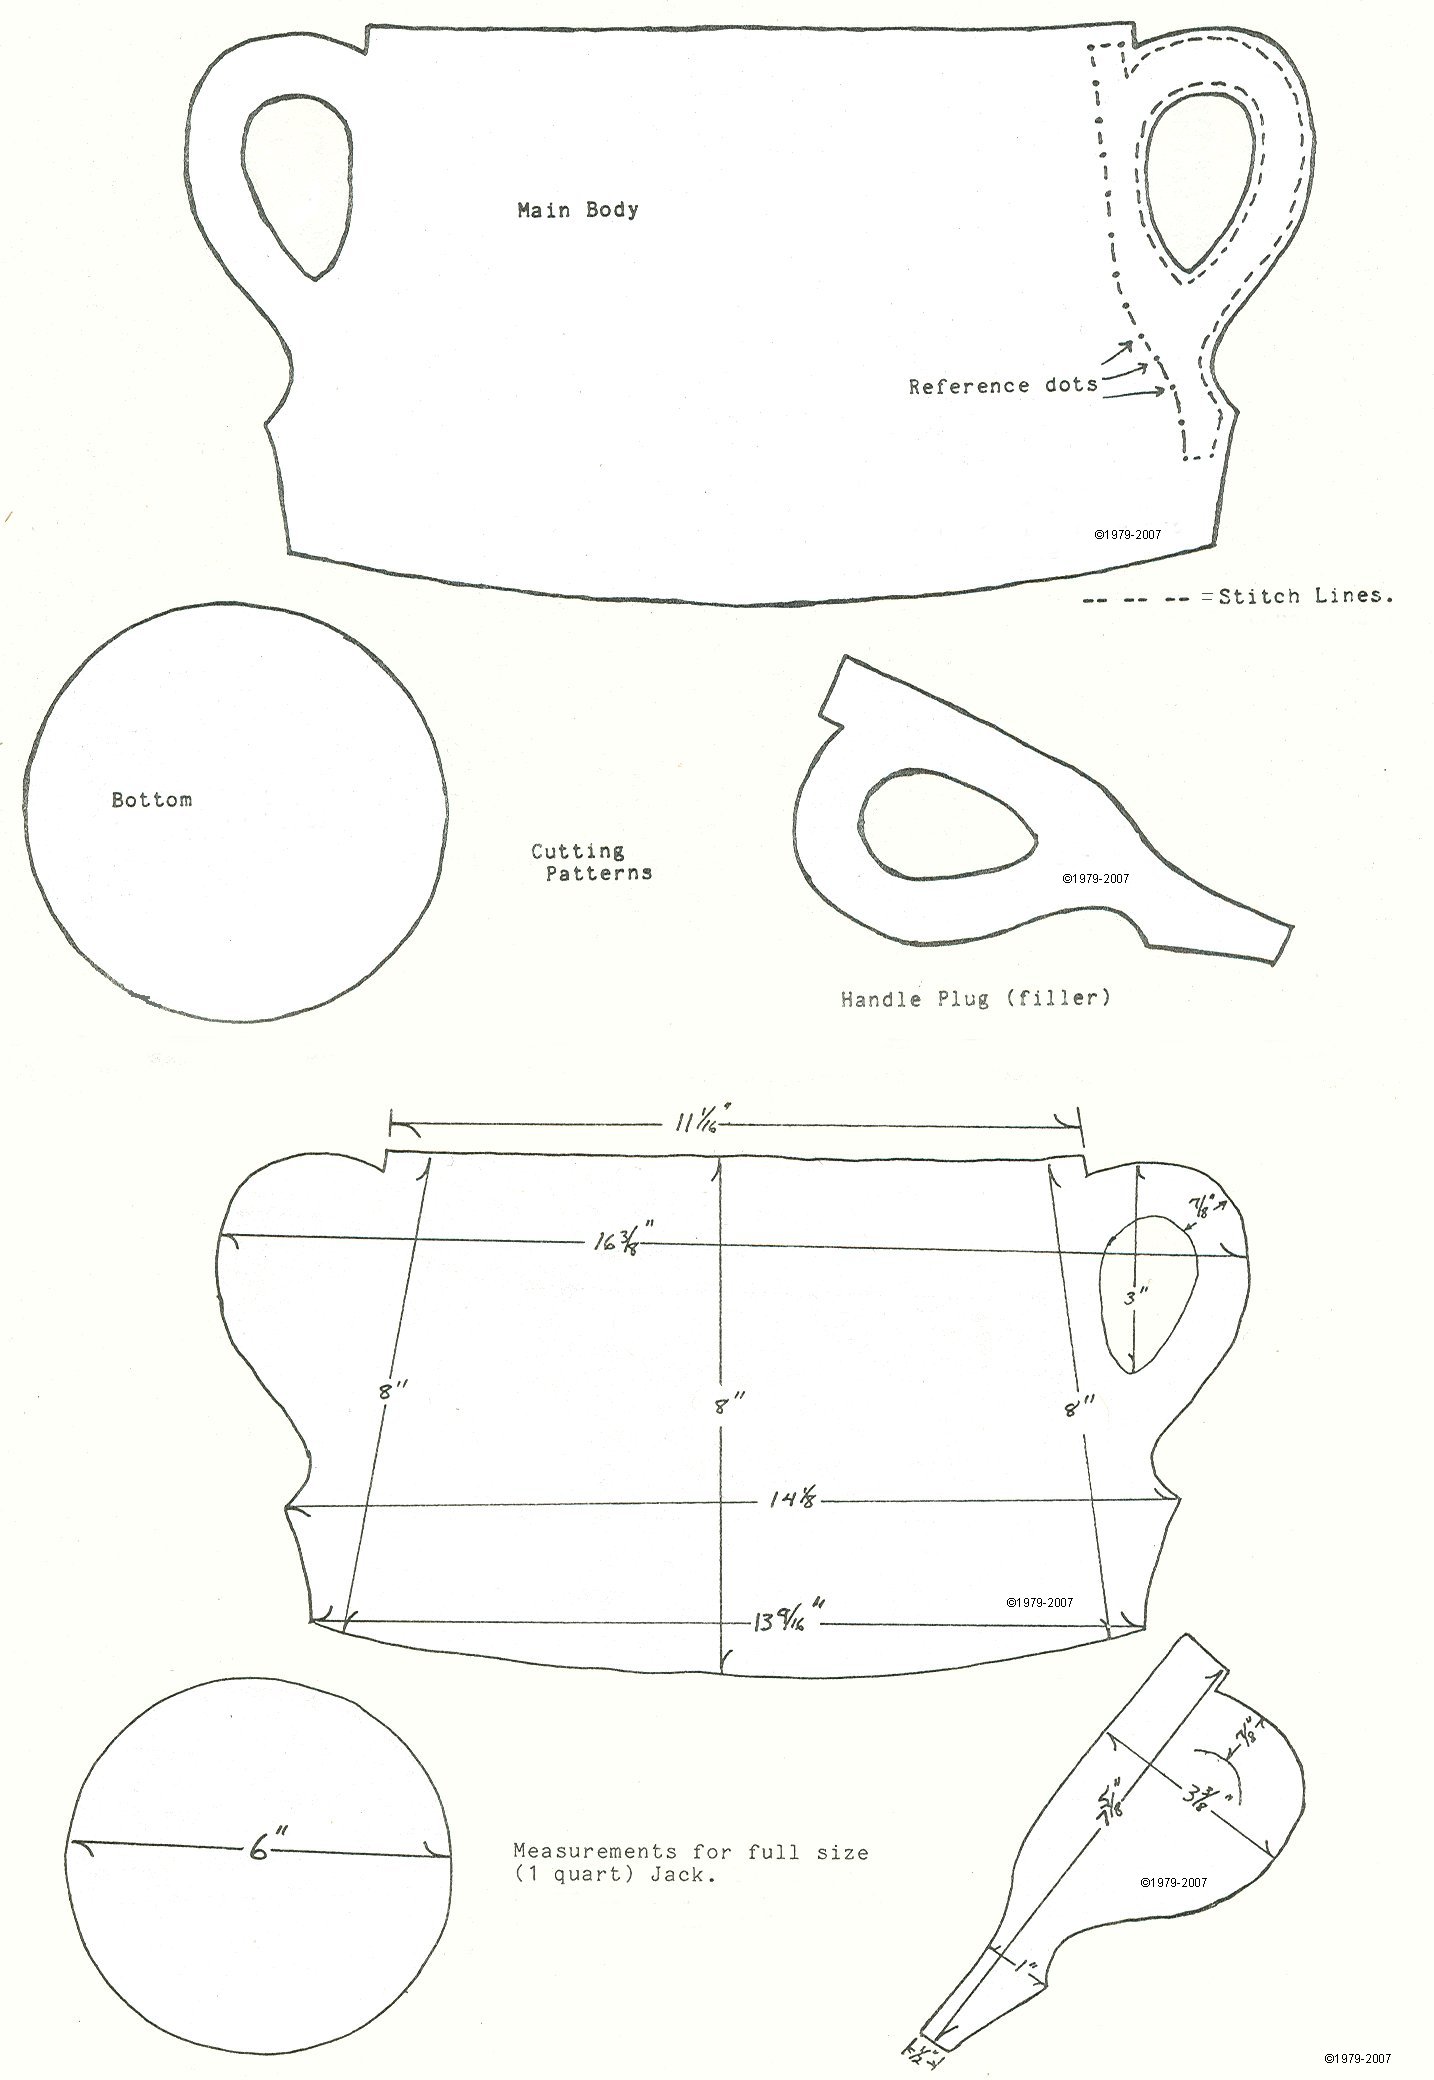
{Jack Pattern
learned from Master Trobere Oakseed}
[Click picture, save then print out to get larger view of
pattern]
2. Once the design/shape is determined, a
form or mould matching the shape that the jack will have, has to be made.
Normally this mould is produced out of wood. This involves either forming
one on a lathe or having one made for you. Attached is a drawing with the
shape and dimensions that the mould needs to have in order to produce a jack
in the "standardized" style being discussed. It is suggested that oak or
rock maple be used to make the mould as this stands up to use the best. How
the mould is used is that the leather shell is soaked, then stretched over
the mould and allowed to dry. Once dry, the leather will retain the mould
shape when it is removed from the mould. However removing the leather from
the mould requires knocking the mould out of the leather that has dried,
hardened, and shrunken/tightened around the mould.
NOTE: Because of the abuse from knocking
it out of the tightened leather, over time a mould begins to crack and
eventually falls apart, requiring a new mould to be made.
Because of the abuse that wood moulds
take, I have experimented with utilizing an epoxy resin to form my moulds.
The main reason for this is that the mould will last longer, thereby
delaying the need to produce more moulds. Secondarily, as I do not do
woodwork, it can be cheaper to produce an epoxy mould than have a wood mould
formed. To utilize the epoxy method, you have to make or find a shell in the
shape you want. A glass, ceramic or plastic container in the shape you want
can filled with epoxy, then broken away, once the resin has hardened. The
"Lost Wax" process can also be utilized to produce a mould. (Create the
mould in wax, surround it with Plaster of Paris, let the plaster harden,
melt away the wax, leaving an empty space in the shape desired, fill with
epoxy, let the epoxy harden, break away the plaster, and you have an epoxy
mould.)
NOTE: The use of the solid mould is the
procedure sources and records dating back to the Middle Ages cite. There are
a couple of alternative methods possible to shape the vessel, that will be
discussed later.
3. The next step is to create patterns
for the shapes the leather pieces need to be. The pattern consisted of three
parts: the body or shell, the plug, and the bottom. Refer to the attached
drawings to understand the shapes being sought. The attached drawings are of
the "standardized" type of jack being discussed and can be used as a
template. Merely enlarge the body-piece drawing until it is 8" (top to
bottom) in the middle. This will result in the dimensions for a quart jack,
and match up for use with the dimensions provided for the wooden mould.
Enlarge the handle or plug piece by the same amount. The bottom piece is
simply a circle of leather. For use with the "standardized" jack, it should
be 6" in diameter.
To create a pattern for a different size
or shape involves experimenting with folding cloth or paper templates until
achieving the shape/size sought after. The easiest method I have found is to
pin cloth around the mould, then trim it. Take the cloth off, lay on thin
cardboard or matte-board and draw around it. This forms the main section of
the shell piece, without handles. It should have a slight curve to
accommodate the forming of a rounded shape. You will now need to determine a
handle shape. I recommend using the handle shape provided in the attached
drawings, as this is the most period of shapes, but you can create your own.
If using the handle shape in the attached drawings to add to your own
pattern, merely enlarge it until its length is equal to the sides of your
body piece. Lay the enlargement next to the sides of the shell pieces, and
draw around it (on each side of the body piece) to complete the shell
pattern. The handle shape should also be drawn out on the cardboard, by
itself, as this forms the plug piece. The bottom piece should be a circle
whose diameter is about 2" larger than the bottom of the mould being used.
It is usually easier to form a pattern from an existing mould rather than
make a mould to fit an existing pattern, but it can be done. If you prefer
to attempt this method, you can use the attached patterns, enlarge them to
the size desired, then take measurements to form the
mould.
NOTE: Forming the pattern pieces to fit
your mould is perhaps the most difficult part of the
procedure.
4. Once you have the mould and pattern
pieces, you are ready to create your jack. The pattern pieces are laid on
the leather. Mark around the pieces and cut them out. The body or shell
piece is folded over so that the two handles overlap. Make sure that the
grain (smooth side) is on the outside. The plug piece is placed between the
two handles and all three are glued together, forming one thick handle.
Using pressure clamps, allow the cement to dry. Once the handle/plug section
dries, placement for the seam holes of the handle is determined. Mark,
groove and space the place for sewing holes by utilizing the groover and the
spacing wheel. The holes are then "punched" by hand, one at a time, with a
stabbing awl. As the holes are made they are sewn through (again by hand)
using the leathercrafter's two-needle stitch. Once the handle is sewn,
smooth out the edges with sandpaper.
5. The next step is to form the body
shape. This is done by soaking the shell piece in water until it is
thoroughly saturated with water and very flexible. Recommended time of
soaking is about 30 minutes. At this point the shell is stretched over the
mould and allowed to dry. Once dry, the mould is knocked out of the leather.
You will find that the leather will retain the shape of the mould and be
lighter in weight. [The reason for this is that by soaking the leather, the
natural oils in it come out into the water. This loss of oil lightens the
weight of the leather. The extraction of oil also re-aligns the fibers that
compose the leather making it harden, shrink slightly and causing it to
retain the shape it was last in.] Following the removal of the shell from
the mould, it is then trimmed at the top and bottom to form a level lip and
base to the vessel, and burnished (smoothed). Now it is ready to have a
bottom attached.
6. On the body piece, near the bottom,
seams for sewing the bottom piece in are determined, marked, grooved and
spaced in a manner similar to what was done on the handle. The bottom piece
is then soaked in water until flexible. It is then "stuffed" into the bottom
of the body piece, with the edge of the bottom piece bent back or curved
toward the bottom of the jack. With a stabbing awl, a hole is "punched" by
hand through the body piece and into the curled up edge of the bottom piece.
This hole is then sewn through. This procedure continues around the entire
jack until the bottom piece is completely sewn in. The bottom piece is then
trimmed off even with bottom of the body piece and burnished. Once the
bottom section is dry, it is time to coat the inside of the jack to make it
waterproof.
7. In period the jacks were lined with a
variety of substances. (Pitch, pine tar resin, beef/mutton fat tallow, or
beeswax.) Most, if not all, of these substances are considered today to be
hazardous or unhealthy, so they are not used. Until recently, most craftsmen
utilized a product known as Brewer's Pitch. It looked and acted like actual
pitch, but was actually a black thermoplastic that was safe, easy to use and
non-toxic. It was utilized by large beer manufacturers to line their wooden
beer vats. However, in the last few years, the beer companies switched from
lined wooden vats to massive plastic vats. Because of this, the company that
produced the Brewer's Pitch is no longer in business and it is not possible
to purchase more. Since this occurrence, most leathercraftsmen have been
experimenting with various epoxies and resins to find a suitable
replacement.
One of the most common linings used at
present are the non-toxic, food grade safe resins that are most notably used
on wooden toys for small children. One brand of this type of resin is
Envirotex. This resin is a two-part mixture that hardens after a period of
time.
To utilize the resin, I first tape the
seam between the bottom piece and the shell piece with masking tape. This
will help prevent any leaks that may result from the thin resin. I then
place a piece of waxed paper on the surface where I will set the jack once
lined. If some resin does leak through, this will not only protect the
surface, but prevent anything from sticking to the bottom of the jack. Next
I mix a batch of resin, pour it into the jack and "swish" it around until it
coats the inside. The jack is then set down in a normal position, and any
excess resin is allowed to pool in the bottom and harden there, affording
extra waterproofing there as that is the area most likely to leak. The
advantage of the resin over the former pitch is that it is easier to work
with. Brewer's Pitch required heating to a "molten" stage, required
protective gear for working with heated substances and smelled bad while it
was hot. The disadvantage of the resin is that it is a thinner liquid and
tries to leak out through any large seam holes rather than filling them,
which Brewer's Pitch would do. Also, the thinner, transparent resin does not
give the appearance of period pitch lining. However, in the interests of
health safety, this compromise must be made.
Another product that is available, is a
food-grade-safe resin that is called Brewer's Pitch by the company that
sells it, but it is actually a yellowish-colored modern pine tar substitute.
The major problem with this product is that it becoming tacky/sticky just
from holding it in your hand.
8. Once the lining has set and hardened,
the jack is tested for waterproofness. To do this, the jack is filled
completely to the top with water and let stand for 24 hours. If no leaks
appear, it is ready to be finished. If leaks do appear, the leather is
allowed to dry from the water and then a second coat of liner is applied.
This step is repeated until the jack proves to be waterproof.
9. The next step is to finish the
exterior of the jack. Conventional wisdom states that decoration on jacks is
not done until after it is formed, waterproofed and tested. The reason for
this is that the forming process stretches the leather, and if the design
were done before forming, it would be distorted by the forming process. The
jack is waterproofed and tested before decorating so that any spillage or
other problems do not ruin the decoration. However, experimentation has
shown that the carving of designs can be done on the shell piece, while it
is flat, before it is folded over and the handle sewn. The stretching is not
sufficient to distort the design. However, dyeing the leather or painting
the design must wait until this time, due to the soaking the leather goes
through.
NOTE: The most common design utilized in
period for jacks were coats-of-arms.
At this point, after the carving of the
design is done, the body of the jack is dyed with leather dye. If desired,
the design is then painted. The paint I recommend to use is modern acrylic
paint. There are several reasons for the use of this type of paint. It is
easy to obtain, it provides a good heraldic color, it will retain it's color
for a much longer period of time than period-type paints and it works well
on leather.
10. The last step is to coat the outside
with a clear lacquer, a process that was many times done in
period.
VII. Alternate Formation
Methods
A. Two-step moulding. Instead of a solid
mould, this procedure uses branches or round wood pieces of different sizes.
The small circumference end of the leather shell is soaked and formed on an
appropriate size piece of wood. Once it has dried, the other (larger) end is
soaked and formed over a second larger piece of wood. You allow the leather to
"naturally" form the bell shape by stretching from the small size to the large
size. The disadvantage is that it takes longer and there is a little less
uniformity in shape when making several. The advantage is that you don't have
to make a pattern to fit your mould. You can use the standard pattern provided
in the attached drawings, enlarge them to the size of the jack you want, then
form the round pieces to fit the size of the leather.
B. Sand forming. This involves sewing the
shell piece, then precisely marking the bottom piece, soaking it and sewing it
in before the shell is formed. I would recommend drawing circles in the
appropriate size on the bottom piece, before soaking. Then when sewing, make
sure that your stitches come back through the circle. This will help guarantee
that you are forming a perfect circle for the bottom. Once the bottom is sewn
in, the entire piece is soaked. Once soaked the vessel is filled with fine
sand. Use a thick rod or stick to "firmly pack the sand in" and to stretch the
leather into the desired shape. Keep adding sand until the vessel is filled.
Some hand forming of the shape may be necessary. Once totally full, allow the
shell to dry. This should form the completed blank shell. Now proceed with the
rest of the steps as usual. The disadvantages to this method are that it
requires precision sewing of the bottom piece, to form a round shaped bottom.
Also, it can be difficult to get the leather to stretch consistently to create
an evenly formed vessel. The advantage is that you don't have to make a
pattern to fit a mould. You can use the standard pattern provided in the
attached drawings, enlarge them to the size of the jack you want, then use the
sand to make the final shape.
VIII.
Bibliography
Black Jacks and Leather Bottells
by
Oliver Baker
Compleat Anachronist #8
by Trobere
Oakseed
Compleat Anachronist #18
by Trobere
Oakseed
Inns, Ales and Drinking Customs of Old
England
by Frederick W. Hackwood
Leathercraftsmanship
by John W.
Waterer
©1998, 1999, 2000, 2001, 2002, 2003, 2004,
2005, 2006, 2007 Ron Knight
Baron Modar Neznanich, Order of the Pelican
e-mail: modar@everestkc.net
Permission to Print
To SCA Interests
Page
To New Member
Information
To Modar's Heraldry
Page
Back to Modar's
Leatherwork Page
Modar the Black Pelican