 |
A Late 15th Century
Italian Chemise Pattern A
brief how-to by Baroness Briana Etain MacKorkhill
A chemise or shift was the foundation of
most multilayered garments. As such it varied from
utilitarian to decorative according to type of material
used and visibility. It was used in various forms from
early 10th century to 15th century Italian through to the
end of our period. The neckline varied to fit most every
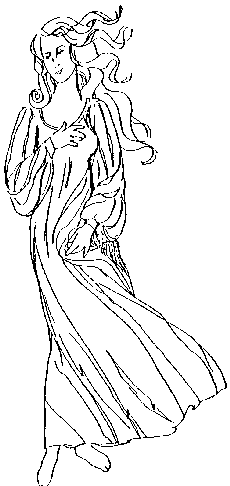
lady's needs. This particular pattern came from Dress
In Italian Painting and has proved invaluable. It is
simple, easy to make, and looks quite good when finished.
It has a drawstring neckline and optional drawstring, tie
or button cuffs. This pattern fits most adults (M to
XXL).
You will need:
| approx. 6-7 yards of 44" to 45"
wide material |
| (muslin, gauze, cotton, lawn, etc. usually in
white or cream) |
| |
| tape measure |
| |
| pencil |
| |
| 1 package of wide bias tape to match material |
| |
| drawstring at least 60" long |
| |
| 1 safety pin |
| |
| (optional - 2 buttons) |
|
| |
|
To start, take the following measurements. Make sure the
subject is standing erect, but relaxed.
Full back length
(from base of neck to floor)_____________+2" = _______
Chest measurement
(around fullest part) __________________+2" = _______
Armhole measurement ________________________
Shoulder width
(base of neck to tip of shoulder) _________________
Arm length
(outside with arm bent) ________________________
Wrist _____________________________________
Now that you have your measurements:
| 1. |
Use the full back length plus ease to measure your
material. Fold the material over at the top so that you
have two lengths of material the length of the back. Do
not cut these apart. |
| 2. |
Next fold open side to open side, still maintaining
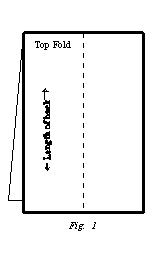
the full back length of material. Pin these so that they
don't shift. (See Fig. 1). |
| 3. |
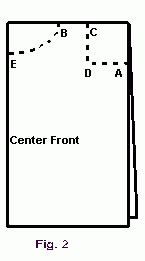
From the top fold, measure down the open side half
the armhole measurement plus 2 inches, and place a pin
there. This is pin A. (See Fig. 2). |
| 4. |
From the intersection of the center and top fold
measure toward the open edges 1/4 the chest measurement
plus ease and place another pin there. This is pin B. |
| 5. |
From pin B add 4 inches toward the outside open
edges. Place a pin there this is pin C. |
| 6. |
Measure from pin C to the open edge. Take this
measurement to pin A and measure back toward the center
fold. This is pin D. You should have a rectangle looking
armhole. (See Fig. 2) Pattern works best if armhole
cut-out is no more than 6 inches. Put excess on the
center fold. |
| 7. |
Again from the fold intersection measure down 3
inches. Place pin E there. |
| 8. |
Make a gradual curve from pin B to pin E. This is the
neckline. |
| 9. |
You are now ready to cut. Cut from pin C To D To A.
You now have armholes. (Save your cutout pieces). Cut
from pin B to Pin E making your neckline. (After the
initial chemise, you can use the cutout pieces as
patterns, thus dispensing with all the measuring.) |
| 10. |
Take the arm length plus at least 2 inches for sleeve
length and at least the full measurement of the armhole
plus 4 inches. You may of course use more material in the
width for added fullness in the sleeves. I've found it
easy just to use the material width for very full
sleeves. |
Now you're ready to sew. Stretch out the armhole flat and
pleat your sleeve to it. Disregard the flap to the side seam.
Pleating Hint: Take your sleeve
and fold the width in half, mark it (make your and mark the very
edges within the seam allowance), then fold each half in half,
matching mark to mark, and marking each new one. When your sleeve
is divided in 16 or 32 (depending on how big you want your
pleats), do the same to the armhole, marking each fold the same
number. Then match up the marks, flatten out the excess and you
will have an equally divided and pleated sleeve. This also works
quite well when pleating a skirt onto a bodice or waistband.
After pinning your sleeves, make sure both are pinned on the
same side of the fabric. Then sew each, leaving the 1/2 inch seam
allowance on either end free.
Next take right side to right side of the sleeve and sew the
sleeve length in a 1/2 inch seam all the way up to the body of
the chemise.
Next sew up the side seams on each side. These will not be
connected to the underarm.
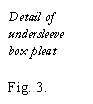
Now take the side seam and place it next to the underarm
making a box pleat. Pin this from the outside so that it hangs
closed and straight. (See Fig. 3). Sew on the outside straight
across the pleat to secure it. You may have to blind stitch the
pleat together just above the pleat seam.
Pin the bias tape to the right side of the neckline. (I
sometimes put two buttonholes on the fabric about 1/4 inch from
the edge on the center front so that the strings can be tied from
the outside.) Unfold your bias tape and sew on the fold--it's
usually about 1/4 inch wide--for the first pass. Turn to the
inside and pin down leaving the other fold folded (this makes a
real nice finished seam), sew and your have your drawstring
casing. Using your safety pin, thread your drawstring.
Cuffs can be done in three different ways:
1. Use bias tape the same way as on the neckline to form a
casing so that a drawstring may be used;
2. Use the pieces that you saved in cutting out the armholes
to form fixed cuffs that tie; or
3. Use those pieces to form fixed cuffs that have a buttons
and loops.
If you choose the fixed cuffs that tie, fold the piece so that
it has the fold on the short side, take your wrist measurement
and measure 1/2 that measure from the fold. Mark both directions
so that you have centered your wrist measurement on that cuff.
Open your sleeve seams about 3-4 inches. Next gather as tightly
as possible your sleeve onto the cuff starting at one mark and
ending at the other. Sew this down and fold the cuff over and sew
it down again. Make sure to extend the seam the entire length of
the fabric so that your ties will be finished.
If you are going to use buttons and loops, just cut the pieces
1 inch larger than your wrist measurement and fit like above.
Hem the bottom to your desired length and you have a chemise.
©1998, 1999, 2000, 2001, 2002, 2003, 2004, 2005,
2006, 2007, 2008, 2009, 2010, 2011
Sheryl Knight (Baroness Briana Etain MacKorkhill)
Permission
to Print
To
Briana's Clothing Page